After purchasing your Mac, you chose to replace your old phone with an iPhone, thus beginning the formation of your Apple ecosystem. However, being still a novice on the subject for all intents and purposes, you still haven't fully understood how to connect the two devices together.
Do you want, for example, view photos you took with your iPhone on Mac, to better appreciate the details of the shots. Excellent, yours is a more than legitimate choice and we are here to help you.
Here we explain in detail how to transfer photos from iPhone to Mac, illustrating all the shapes that exist. For each of them we will provide you with a step-by-step guide, to further simplify the procedure to be carried out.
This is what we will address in this new in-depth study:
index- How to Transfer Photos from iPhone to Mac Wired Without iTunes
- How to transfer photos from iPhone to Mac without cable
How to Transfer Photos from iPhone to Mac Wired Without iTunes
Starting with macOS 10.15 (Catalina) and later, transferring photos from iPhone to Mac with cable happens sin itunesby connecting your phone to your computer using the Lightning cable and the Photos app. If it is your first time, you must also prepare the import from iPhone by authorizing the connection of the mobile device to the Mac.
These are the steps to follow:
- Connect the Lightning connector to the iPhone and the other end to the USB input on your Mac (if you have a newer generation Mac, insert the other end into one of the available Thunderbolt ports).
- Open Finder and click on the iPhone icon located in the left sidebar.
- Press the "Authorize" button on both Mac and iPhone.
- Enter your device unlock code to complete the connection between iPhone and Mac.
- Select the Photos app in the Dock bar.
- In the new window that opens, locate the "Devices" item in the sidebar and select the name of the iPhone.
- Use the "Import To" menu to decide which photos to transfer and exactly where on your Mac to place them.
- Click on the "Import all new photos" or "Import select (X)" button (if you choose only some photos by typing the combination cmd+click) located at the top right to continue the image transfer.
Alternatively, to transfer photos from iPhone to Mac without iTunes, you can use the utility built into macOS: Image acquisition. Below is the step by step procedure:
- Open Launchpad on Mac.
- Enter the "Other" folder.
- Select the camera icon to launch the Image Capture utility.
In the new window that opens, select the iPhone icon in the left sidebar.
Now choose the folder on your computer where you want to transfer the photos via the “Import to” menu. - Select the photos to transfer and when you are finished press the "Download all" or "Download" button (if you decide not to import all the images) to start the import.
If you think the cable procedure involves too many steps, in the next chapter we will explain how to transfer photos from iPhone to Mac without cable.
How to transfer photos from iPhone to Mac without cable
By Transfer photos from iPhone to Mac without cable it is possible to use ICloud Photo or, alternatively, technology Launch from the air. The latter uses the Bluetooth module and the Wi-Fi network of two Apple devices to share data wirelessly from one device to another.
Transfer Photos from iPhone to Mac with iCloud Photos
iCloud Photos is the service that allows you to store in iCloud the photos and videos that a user takes with the iPhone or stores from time to time while using the Mac. When stored, multimedia content is automatically organized into “Years”, “Months”. ", "Days" and "All photos".
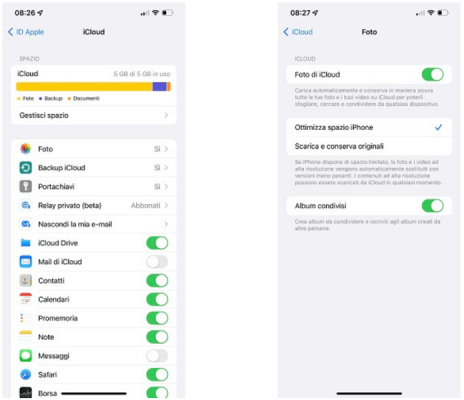
To start transferring images by synchronizing the two devices, it is necessary activate iCloud Photos setting up iCloud and signing in with the same Apple ID on iPhone and Mac.
Start first fromiPhone:
- Open the Settings app (the app represented by the gear icon)
- Select the profile icon.
- Cheap with iCloud.
- Click "Photos."
- Move the toggle next to the "iCloud Photos" option from left to right to activate syncing from iPhone.
A similar procedure must then be performed on Mac:
- Select the Apple menu at the top left and, in the menu that opens, click “System Preferences”
- Click on the "Apple ID" option
- Press the "iCloud" tab located in the sidebar
- Click on the "Photos" item to complete the activation of synchronization also from Mac.
Well, now that you have successfully completed the iCloud Photos setup on both iPhone and Mac, wait a few moments for the setup to begin. automatic synchronization of the images contained in the iPhone Photos app to the Mac Photos program. From now on, every time you take a new photo with your iPhone, it will automatically sync with iCloud Photos.
very important: The memory occupied in Photos consumes the storage space guaranteed by the free iCloud plan, which corresponds to 5 GB. When you run out of memory, to continue using the syncing service you need to increase your iCloud space by purchasing one of the available plans. Currently, iCloud+ offers three different monthly payment plans: 50 GB (0,99 euros), 200 GB (2,99 euros), 2 TB (9,99 euros). Alternatively, you may also find information on how to free up space in iCloud useful.
Note: Instead of iCloud you can use another of the many similar services available online, such as Google Photos, Amazon Photos and Dropbox. We tell you more about it in the in-depth analysis of the best free and paid cloud services.
Transfer Photos from iPhone to Mac with AirDrop
Il Transfer photos from iPhone to Mac wireless is also possible through Bluetooth using wireless technology Launch from the air, present in the iPhone 5 and later models and in Macs marketed after 2008. As you can imagine, it is one of the simplest systems to share data between two Apple devices.
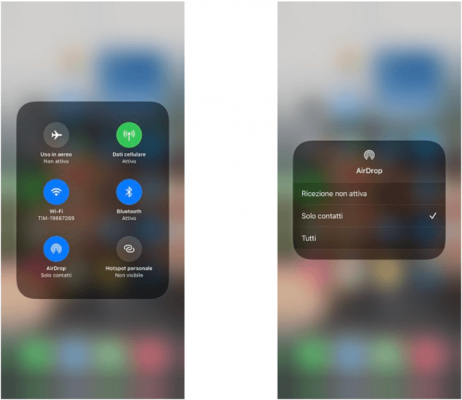
Use Launch from the air, first of all it is necessary to proceed with your activation on iPhone and Mac. The procedure on iOS mobile devices is very simple: open the control center by swiping from bottom to top, make sure that both Wi-Fi and Bluetooth are "on", then press the Bluetooth icon for two or three seconds until a new window appears with the AirDrop icon.
Note- By default, AirDrop is active with the "Contacts Only" option, but you can also choose the "Everyone" option if you want the sharing via AirDrop to also happen with users who are not in your contact list in your notebook. of addresses.
On Mac, however, simply select the "Go" option in the top menu bar and then click on the "AirDrop" item. Immediately afterward, a new window will open through which you can configure the service. Be sure to also turn on Wi-Fi and Bluetooth on the Mac, as seen above on the iPhone.
Now you can finally transfer photos from iPhone to Mac using AirDrop:
- Open the Photos app on iPhone.
- Tap the "Select" button and choose the images you want to transfer to Mac.
Tap the square icon with the arrow at the bottom left (the share icon) and select the "AirDrop" item. - On the main AirDrop screen, select your Mac icon and wait for the image transfer to complete successfully.
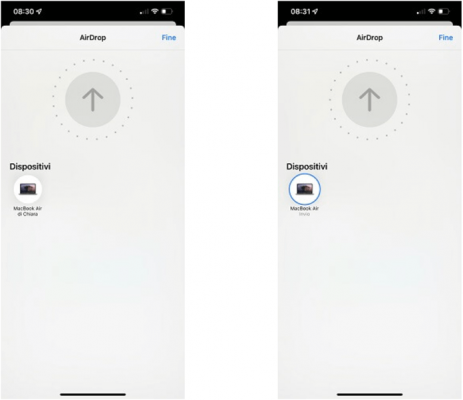
Note: For AirDrop to work correctly, remember that your iPhone and Mac must be connected to the same Wi-Fi network.
On the same topic you may also be interested in: How to transfer photos from smartphone to PC
How to transfer photos from iPhone to Mac