


Please note:
The solution is based on the American version of the game, so there may be differences with the Spanish one.
Claire's campaign
Medals available
Knock down an enemy five times by blinding them with Moira's torch and hitting them with a physical attack.
Defeat eight enemies using the rotating blades.
Stun ten enemies with Moira's torch.
Defeat eight enemies using secondary weapons.
Defeat three enemies with a silent attack.
Defeat eight enemies with a headshot.
Find three treasures.
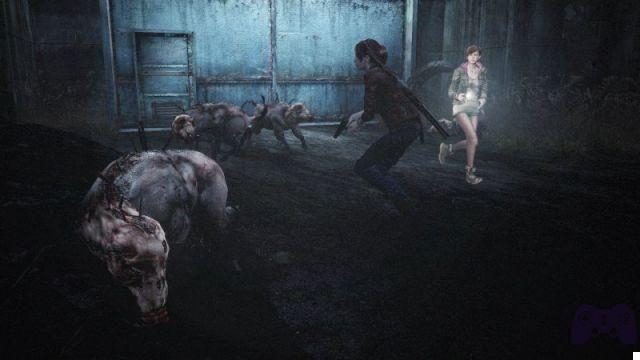
Kill ten giant spiders.
Open three chests of Moira.
Find six hidden objects with Moira.
Main campaign
Once the long introduction to the game is over, you will find yourself in the role of Claire who has just woken up inside a cell with a strange bracelet attached. You won't have any kind of weapon with you, so get familiar with the controls and go down the row of cells. You will come across Moira who will join you and provide you with her precious support. It is important to know that in Resident Evil Revelations 2, the companions will not assist you as they do in the previous chapters of the saga, that is by attacking the enemies in first person, but will only stun them using the flashlight, and in the future also using a metal bracket. on enemies lying on the ground, or taken from behind. Moira, then she can stun enemies with the flashlight, but the actual fight will be Claire's turn.
The next areas, definitely scary, will not put you in front of any imminent danger, so keep going until you hear some screams and notice some blood. In the room you enter, you will find a table with a battered and tortured body on it and a view of the next room. Before entering the room you had the view on, take the other path and get a knife for Claire and a torch for Moira. Go back inside the room with the table and smash the windows using Claire's knife, you can also find a note regarding the tested subjects and some pistol bullets in one of the drawers of the desk.
Continue inside the strange infrastructure and get help from your partner in moving the various debris that hinder you. When you start moving some shelves, you will be attacked by an Afflicted one. There is no way to avoid getting hit, so quickly press the knife attack button and pull the enemy back, then keep moving the shelf into the next room. Follow the Afflicted one chasing Gina and be sure to search the room for two green herbs (one of which is inside a locker) and continue on.
Once on the opposite side of the gate (these will all be points of no return) you will witness what happens to Gina. One of the doors will be closed, so take the other available path to reach a large room with a dead man hanging and out of reach. Obviously when you try to get the keys from the corpse, it will fall to the floor below.
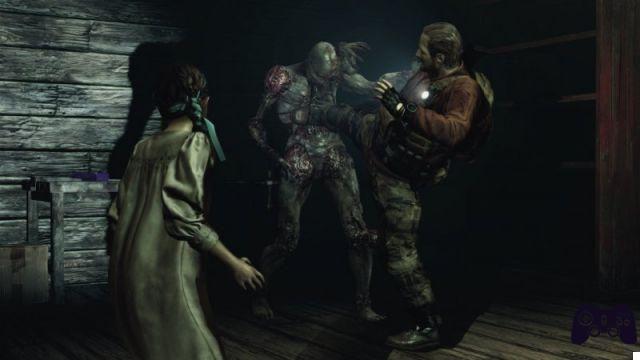
Take the long way through the halls (none of the doors will be open for now) and go down the ladder to inspect the guard's corpse. Claire will automatically take the gun and Moira will light the room to find the keys which will be on a boiler above the corpse. When Claire hits the keys and knocks them to the ground, one Afflicted will attack you from the left door and another from the top railing. You can decide to avoid them and escape towards the ladder, or eliminate them together with a headshot followed by a melee attack.
Kafka's Drawing
You can find these collectibles by directing the light from Moira's torch along the wall and illuminating these when you are close enough. You will find one in the room, where the Afflicted One was who broke in.
If you are still stuck in the lower area, you can find some ammo in the room, otherwise go back to the closed door and prepare for a fight. As you retrace the path between the rooms in reverse, check inside a drawer for a gem that will give you several points, then return to the longer room. You'll find three more Afflicted along with some ammo and a green grass inside an unlocked door.
The emblem of the Tower
These emblems will be hidden throughout the game, from both Claire's and Barry's Campaigns. Sometimes you can also find those not received during the previous campaign. This particular blue emblem will be found inside a bin in front of the staircase you took from the lower level. From where the guardhouse was hanging, you can also hit it from a distance.
Go through the newly unlocked door and pick up the shotgun from the corpse. Moira will refuse to use firearms, but you will soon find something for her too. Inside the next room, you'll need to use your partner's flashlight to reveal some shiny objects in the dark. On the shelf you will find the metal bracket for Moira along with a Topaz and some ammo.
Kafka's drawing
On the side of the door, aim the flashlight beam at the wall to find another drawing.
Use the metal bracket to open the door and continue inside the next room. The strange figure that is fleeing will not yet be visible. Before going through the next gate, be sure to collect the shotgun ammo, along with the pistol ammo that will be hidden. The next area will be the detention area and it is full of enemies who fortunately are still blocked. Feel free to explore the area without risking any danger, especially the inside of a cell on the left where you will find a Sapphire embedded in the ceiling and a Topaz on the floor.
After your mysterious observer has finished speaking, head outside the block to find a map of the detention center along with some ammo hidden under the table. You will also find some instructions related to a flamethrower that will be useful in the future. Unfortunately, to continue you will have to find a gear.
The emblem of the Tower
In the room where you found the detention center map, check the ceiling to the right for an emblem at the top.
Head right past the deactivated rotating copper trap to the next room. You will find a note from Kafka on a chair and a chest with different shotgun ammo. The next room will contain some sort of torture machines with the gear you care about locked in. Since the machine is off, you will need to make sure that the electricity returns to the place. Enter the adjacent room and collect the tourniquet along with some pieces for the workbench on which you can increase the damage of one of your firearms.
Go back to the previously left room, give Moira a hand to go up to the second floor and check the locked chest. You will find yourself in front of a real minigame that you will have to rotate until the circle is orange, then arrange it carefully until you unlock the lock. If the circle turns red, it means that you are not close enough to the target circle, so try to stop before failing the game and being forced to start over. Collect the pistol ammo and unlock the door to the room with the work table and allow Claire to join you.
The Emblem of the Tower
Go back to the room where you helped Moira upstairs and check above the torture machine to find an emblem you need to shoot.
The next room will lead you close to the control room, but you won't have the right key to enter it for now. Continue to the next dark area where you will find at least one Afflicted inside one of the smaller rooms along with a Topaz behind an open gate, a Ruby under a table and another Topaz inside the cabin from which the 'Afflicted jumped out.
The next area contains two stairs leading down to the basements and it's up to you to decide which one to go down. To separate the two stairs there is a large room with two rooms, from the first of these two Afflicted will emerge (you will also find a lace just in front of the door), inside you can get an interesting note on the sensors you are wearing and a Hidden Topaz. Going down the hall, an Afflicted will leap at you breaking through a window and in the next large room you will find another note, a chest that you can unlock with the pieces, a Molotov cocktail (to keep for the future) and the path to another. ladder.
Kafka's drawing
On the big wall before you leave the great dark room, light up another drawing in blue.
There will be several enemies waiting for you in the dungeons and by descending the furthest ladder you can get the element of surprise. If your opponents give you their back, attack them with a silent melee attack, if instead they will be in front of you you will also have to face a new type of enemy: the Iron Head. Unlike the other opponents, the Ironhead cannot be hit in the back of the head, so get Moira to help distract him or avoid his attacks to immediately hit him with a nice shotgun shot in the back.
Head to the door opposite the locked one to find yourself inside a hall with a rusty key. By moving the pile of trash from the back door, you'll create a convenient shortcut back to the prison block.
Open the locked door and get ready to take out several giant spiders. These worryingly sized arachnids will keep coming out of the trash machine, but they can easily be killed with a swipe of your trusty knife. Clean up the area as best you can and give Moira a hand to climb up to the button. Once the electrical power returns to the compound, all the traps with spinning blades will activate, including the one beside you. Quickly back up and get ready to dodge the blow from an Afflicted who will come out the nearby door. Stun the enemy with the flashlight beam and run inside the room from which he came out, you will find a drawing of Kafka on the wall to the left along with a hidden object. In the next room, Claire will find the active garbage machine, look for a gap between the indentation at the top and jump before being crushed.
Kafka's drawing
Take out the Afflicted who are attacking Moira, then run to the room they came out of, light up one of the walls to find another drawing.
With all the traps back in operation, return to the torture room. You can take the longer route, or dodge the traps to take the shortcut to the detention center. Once there, turn on the torture machine and collect the gear, then return to the main hall. Before setting the gear, take out the Afflicted and the Ironhead who are prowling the area (you can use the traps with the rotating blades to your advantage, simply by luring the enemies on them).
Once the gear is fixed, the door will open along with others in the detention center, literally freeing a horde of Afflicted along with two or three Ironheads. You will have two options to save your skin; head into the room with the giant trap in the center and light the flamethrower so it's headed for the detention block, then use the nearby valve to ignite the machinery and watch your opponents burn (if you light the flamethrower before heading towards the detention block , you will detonate a trap with the rotating blades to get some rare parts that you can collect later). If, on the other hand, you decide to give up the flamethrower, settle in front of the gate and take out the enemies with the rifle, or throw the Molotov cocktail, also you can always attract the enemies on the rotating blades. Once you have cleared away any hostile presence, check the now open cells to find some useful items. Use the metal bracket to open the door and let out a new (endless) wave of enemies. He will have the boards to remove from the door, so quickly switch characters to open the door and kill the enemies.
Once you pass the gate, you will pass another point of no return, so make sure you haven't left anything behind.
Kafka's drawing
As soon as you leave the detention center, aim your flashlight at the large wall above the main gate to find a drawing in blue.
You will finally be outside and after receiving the last message from the Superintendent, head to the grassy area (you will find a green grass by a tree) and make your way to the next area. You will reach a place with a large old wooden bridge and a beautiful view of the sea. The metal door near the bridge is closed, but you can crack the nearby chest to get new parts for your weapons. Cross the bridge and help Moira, then head to the radio station.
Tower emblem
The last emblem you can find in this area is on the side of the bridge opposite the sea, move so you can see the bridge in its full length and look for the emblem to shoot against.
Kafka's drawing
The last of Kafka's drawings is hidden shortly after crossing the bridge, turn the side opposite the sea and check the dot along its entire length, then light up the part you came from to find the drawing.
Inside the radio tower, you will have the last chance to upgrade your weapons and collect what you can before using the radio and finishing this part of the first episode.
Barry's campaign
Medals available
Defeat at least five Revenants by hitting only their weak point.
Do not shoot the gun inside the control area of the detention center.
Hit enemies fifteen times with Natalia's brick.
Defeat two enemies with a chain attack.
Defeat eight enemies with a secondary weapon.
Defeat six enemies with a silent attack.
Defeat six enemies with the knife.
Open two chests of Natalia.
Find six hidden objects with Natalia.
Escape the darkness of the forest by starting from the shed within forty seconds.
Main campaign
The story of Barry will begin in a different way from that of Claire, in fact, you will be remarkably prepared and you will have with you a gun, an assault rifle and the faithful Magnum, on the other hand you will have to face a greater number of enemies, faster and more lethal. You will also meet Natalia who, like Moira, will not use conventional weapons, but will be able to use a nice brick to stun or finish the enemies lying on the ground; finally he will be able to aim objects and even enemies through walls.
Once you've taken Barry's controls, don't forget to check the boat you got off from to find a crate containing ammo for the assault rifle. As you progress you will find more shotgun and pistol ammo, but not the Magnum, so use this weapon very sparingly.
Move along the rocks and along the coast with Natalia, smash the barrels for some ammo and open the chest for some shotgun shells. Later you will find yourself facing some giant spiders, take them out and advance until you are inside the field where you will face other enemies.
Tower emblem
Head to the right of the road at the blocked entrance, you will find the emblem amidst some debris.
Once you have taken out all the spiders, head inside the prison to a different area than Claire's. In the room on the left you can collect a red herb that can be mixed with the green ones for even greater healing benefit. Natalia will warn you of some enemies in the next room. These Rags aren't as fast as the Afflicted, but they can also crawl and bite you if you don't take them out quickly. Break the crate and collect the ammo before continuing. Once inside the next room, the ability to identify Natalia's enemies will be very useful to face the opponents in the next room, in fact you can move silently and eliminate all the Rags present on this floor of the center, moreover, always thanks to your partner's skill, you can find different ammo inside the two rooms.
Tower emblem
After the door where the three Marci were waiting for you, check the shelves to see which emblem to shoot.
Collect the map of the detention center on the table in the center and go upstairs paying attention to the Marci that you will find once you have finished the climb; use Natalia's ability to spot them so they don't jump on you. With a minimum of attention you can take out any enemy silently. Check the shelving and fallen tables for cloth, ammo and green grass. To exit this area, grab the chain chest with Barry and pull it to the corner, then climb to the top and enter the gate to find yourself in an area that should be familiar to you. On a peg inside the room you will find the key to the control room, this will not be reachable normally, but Natalia is small enough to reach and collect it. Once you have taken out the enemies and unlocked the door, collect the gunpowder and move the debris to reveal a path to the tool room. You will then find yourself in the same area of the detention center you visited previously, only now there will also be several Marci, all the traps will be active and this means that to retrace the steps of Claire and Moira you will have to turn off the electricity. Go down the path past the control room and go up the stairs to the basement. If in your footsteps you spot a yellow substance on the ground, hit it with a firearm, as it will explode like a contact mine. Once in the basement, avoid the traps and reach the window through which you can see the energy button. Slide Natalia under the grate and turn off the button. Now you can go back to the cell area without any problem.
Returning to the path with the traps deactivated, be sure to check behind them to find an alcove full of parts to upgrade your weapons. If you didn't use the flamethrower to take out the Afflicted with Claire, you can skip the control room and go straight to the exit. More easily, however, you will find a wall of fire to block you, enter the control room to find a new type of closed chest that will be opened by facing a minigame very similar to Moira's. Once the chest is open, take the new pieces and take note of the document that talks about a walled block.
Use the console and free the remaining rotten prisoners. Take out any enemies that come close to you and check inside the cells for some useful items. On the far right of the block, you will find a small hole that Natalia can pass through. You will find yourself on the opposite side of the flamethrower, where you can turn it and, if you haven't blown the now deactivated blade trap, collect the parts to increase the damage of your weapons.
Insect larva
There will be a larva hidden by the path that Natalia will take, look for the red cloud and throw a brick against it to reveal it.
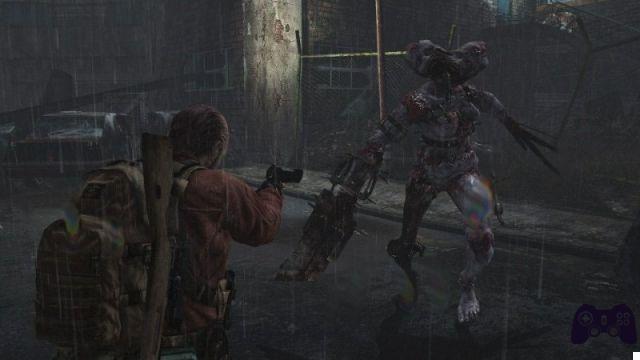
Once outside, retrace Claire's footsteps to the wooden bridge that will be broken. Pass Natalia under the space near the iron door and break the lock on the other side using your trusty brick. After passing, you will notice a new enemy at the top. Head inside the house and collect the green grass along with some ammo, then try to open the door which will be locked. Natalia will draw your attention to a strange noise, look around for blood falling from the roof, the new monster will land in front of you ready to attack.
This new enemy is the Revenant and its hidden weak point can come out of one of its appendages randomly. Fortunately, Natalia can see where she is and can reveal it by throwing a brick at us. Once the enemy is eliminated, break down the door and continue. The next area will be noticeably dark and full of Ravenants, you'll need to use Natalia's ability to locate them and take them out before they see you. You can also find a chest near the edge of the wooded area and let Natalia open it to find a Ruby.
Tower emblem
Once you reach the second area lit with a Revenant and some debris near a rock, go around it and look for the emblem in the middle of some barrels.
Insect larva
When you reach the end of the wooded area, you will find a small shed, enter inside to notice a red light to which you can throw a rock to reveal the larva.
Once past the gate, check the house for any useful items, then break the lock in the outer gate and go down the slope. Once on the bottom, you will notice two Revenants, pick up the nearby Molotov cocktail and take out the enemies. Head left on the small path to a small house and enter it. You will find a Topaz on a shelf, but more importantly, a chest that you can move so that Natalia will join you inside and unlock the door. Collect the grass and parts for the weapons.
Go back to where you eliminated the two Revenants with the Molotov cocktail and continue to the next section. The radio tower is closed, but a large lumber yard separates you and this seems to be a perfect place for an ambush. Before going down, collect the empty bottle and alcohol and combine them to get a Molotov cocktail, collect the map of the forest from the wall and modify your weapons on the work table. Once ready, go down the slope and reach the locked gate on the opposite side. You will be attacked by two Revenants on the right and two more on the left. Head to the collapsed fence and take out another enemy to collect the Topaz inside a chest. Turn on the generator inside and have Natalia point you to another gemstone, then go to the opposite side of the warehouse towards the other house.
Tower emblem
The last emblem is located near the door of the new house. Go right up to a group of barrels, then throw a brick at the emblem on the opposite side.
Inside the house with the many rooms, you will find two more Revenants, remember to look for their weaknesses with Natalia before facing them. Outside turn on the crane to destroy the gate, you will attract more enemies. You can escape to the exit, or hit the Revenants from afar on top of the crates. Reach the open gate and make your way up to the radio tower to complete this first episode.
 Resident Evil: Revelations 2 - Episodio 1 ps4
- ps3
- ps4
- Xone
- x360
- pc
Exit date: March 20 2015


![Guides Sophia's Shop Guide [100%] - Persona 5 Strikers](/images/posts/1f5e1c7629d56d6c792ac770a5d6b182-0.jpg)