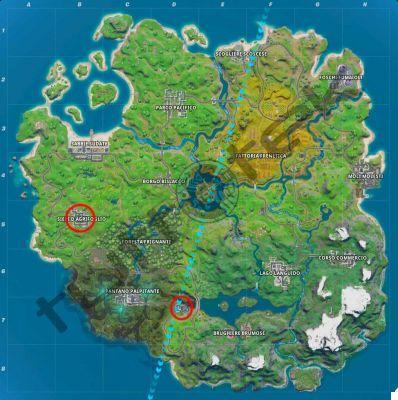
There are 10 Berserker Graves in God of War Ragnarok, containing a total of 13 optional bosses that become available after acquiring the Dead Skofnung Hilt during the main quest: Word of Fate.
You have to finish the story first to go to the tombstone in Niflheim, it is not available during the story. They also count towards 100% completion.
For Berserker bosses that have an orange or purple health bar, you should level up your equipment first. Green means they have a lower gear level than you, yellow means the same level, orange means they are one level higher, purple means they are two levels above you, red means you will die instantly. If a fight is too tough, come back later after crafting gear upgrades. During the story they are quite difficult, it is better to do them later. Always create a Resurrection Stone at the blacksmithin the Special Items section. This allows you to perk up. Also enables mid-combat checkpoints in ISettings > Accessibility > Combat, this creates a checkpoint when bosses are at half health. If you die, you are reborn with your resurrection stone in your inventory and only need to defeat bosses at half health.
 Midgard, Lago dei Nov: Fraekni Lo Zelota
Fraekni can kill you quickly, but has a very predictable attack pattern. At range he will perform an unblockable charge attack, which can be dodged and hit accordingly, or he will jump up and perform a spin attack which is almost always followed by an unblockable slam at close range. So for this you will have to dodge both attacks. At close range, Fraekni can deliver a strike that can be blocked or parried, or it will perform an unblockable attack followed by a regular strike.
When he drops below half health, he will extend his combos: ranged, he will perform 2 (3 critical health) unblockable charge attacks in a row, and sometimes follow up with his unblockable "defense breaker" combo, which it can catch you off guard if you don't expect it. It will also occasionally perform 2 or 3 normal attacks in close combat. Since many of his attacks are charge attacks, it's best to stay close to the wall so that when he tries to attack you you dodge and he won't go far and flog him. Don't be greedy with your blows, only strike when it is vulnerable after a combo or parry.
Svartalfheim, Jarnsmida Mines: Bodvar the Proud and Starolfr the Troublemaker
This is a double boss, so you'll need to pay attention to two enemies. Bodvar will wield two shields and Starolfr will wield two swords. Of two, Bodvar will be the most dangerous. Both will perform melee burst attacks with blockable/unblockable attacks, as well as a variety of dangerous ranged attacks, such as unblockable charge attacks. Bodvar can flash a light in front of him which is super dangerous, and will also do a shield attack in which he charges up before releasing and dealing massive splash damage. For this reason you will want to keep an eye on Bodvar at all times. Starolfr will occasionally cling to walls and throw knives at you, but these can be easily blocked.
You can choose to focus on one until it dies. Both have their advantages, as when you are fighting one you only have one target, but they will rage and start hitting harder. Killing Starolfr first is optimal because he is weakest, then focus on Bodvar next. We recommend using all of your runic attacks and Wrath of Sparta when equipped to disperse damage quickly and use your L1 + Triangle ability. With good dodging and skill usage you will be able to defeat one of them when you have used all of your skills and can then concentrate on the second one. Health crystals will drop during combat.
Svartalfheim, Nidavellir: Hardrefill l'Insensibile
Hardrefill doesn't have a very large repertoire of attacks: at close range he will execute a burst series which can be a mix of regular strikes and defense breaker. These combos can be blocked/avoided and counterattacked after he finished them. At range, he will leap and swing at you to perform a spin attack and will often lead to a burst attack. The main attack to watch out for of Hardrefill is in jump, where a green marker will appear on the ground. This indicates where it will land after about one second, so you'll want to be prepared to dodge as it lands. This attack can deal serious damage but as long as you dodge immediately when you see it jump, you should be able to avoid it without much effort.
As his health gets low, his burst attacks will extend and his jump attacks will start coming in twos and threes. There will be no health crystals during this fight. As usual, prepare your runic attacks and companions.
Svartalfheim, Isle of Alberich: Beigadr the Feared
Beigadr is enchanted by lightning, so most of his attacks will be with ranged lightning bolts. It will launch a variety of unblockable lightning bolts, including four orbs and other area-based lightning that will strike throughout the arena, indicated by danger zones on the floor. In both cases you will have to time your dodge well to avoid them. If you are struck by lightning, you will go into shock and you'll need to press Circle repeatedly to recover. At close range, the Berserker will also throw some punches, but these are all regular attacks so they can be blocked, parried or dodged. Finally there will be a jump attack where after a second or two he will slam into the ground, so you'll want to time your dodge so you don't get hit. There are no health crystals this time, so you'll have to play with caution. Since he's often ranged, you can't be hyper-aggressive here, and you may want to choose to use ranged attacks yourself if necessary.
Alfheim, The Barren Lands: Svipdagr the Frosty and the Sisters of Illska
This is a triple fight, but the Sisters of Illska will share one health bar. The sisters will be enchanted by flames and frost, while Svipdagr will wield double axes. The Sisters will use punches infused with their element, as well as throw ice bolts/fireballs at you. They'll also leap into the air and release multiple unblockable area-of-effect attacks, so keep an eye out for the danger indicators on the floor and stay away from them. It's best to focus on the sisters first as they share a health bar and will mostly attack you from range.
Once the sisters are dead, you'll have Svipdagr to defeat - he'll mainly hit you multiple times with regular strikes, as well as perform an unblockable area-of-effect attack where he jumps into the air and slams next to you, so be prepared to dodge. This is a relatively simple fight as long as you focus on the Sisters first, use your rune/company skills and Wrath of Sparta to kill them quickly, then you can focus on Svipdagr, blocking, parrying and dodging her attacks as needed.
Alfheim, The Forbidden Sands: Hjalti the Unflappable
You will want to stay close to Hjalti during the battle, as he will occasionally perform a shield skill that deals heavy damage from a distance, so you'll want to be close enough to stop him. He will also perform a jump slash attack and an unblockable ranged attack where he jumps and fires two darts at you. There will also be an unblockable area-of-effect slam that you'll want to dodge. Most of these attacks will be done from a distance. At close range, Hjalti will perform more swinging strikes, starting with a simple attack and ending with an unblockable attack. Unleash all your runic attacks and Wrath of Sparta and thus stun him for a while.
Vanaheim, Pilgrim's Landing: Hvitserkr the Bold
Hvitserkr possesses poison-based attacks and will also summon Shadows and Nightmares to fight alongside him. He respawns minions if they die, so don't worry about attacking them directly. Most of his attacks will be ranged, such as throwing two poison blasts, an unblockable attack where he throws four poison blasts at once, and a summon attack where he will throw explosive enemies at you about five times. For normal attack you can block but for others, you'll want to dodge, repeatedly in the case of the summon attack. He'll also rush at you multiple times, but these are pretty simple melee attacks that aren't difficult to deal with.
The biggest problem with Hvitserkr is being overwhelmed by all of his minions and its area of effect attacks. The best way to deal with him is to chain all your runic attacks, companion attacks, and Wrath of Sparta to deal heavy damage to him, using L1 + Triangle when available to deal even more damage. By the time you've exhausted all of your skills, it should hopefully be badly damaged, allowing you to finish it quickly. If needed, you can use your spear or ax for ranged attacks when he's ranged, but you'll need to be wary of his attacks and minions.
 Vanaheim, The Whirlpools: Haklangr the Bearded
Haklangr will shield his health a few times during battle, so when he does he just uses the opposite element's weapon or the Draupnir Spear to break it since works on all shields. All of his attacks will be interrupt or unblockable attacks, so dodge most of them. When in close range, he will swing the hammer a few times before slamming it down. Ranged will leap and leap at you with a spin attack, often followed by the melee combo. His deadliest attack is a very large area-of-effect slam in which he raises the hammer for a few seconds before slamming it down: to avoid it, do two or three dodges and move away from the area which, although it seems very large, has a limit. As his health decreases, he will start hitting his regular slams in succession more frequently. Most of this battle comes down to dodging, just unload your arsenal of skills and shouldn't be too much of a threat.
Niflheim, Fields of Mist: Skjothendi the Unerring
Skjorthendi is the toughest of berserkers, as he uses Bifrost attacks and can teleport around. It is highly recommended to use the Bifrost Remedy and Heavenly Panacea Amulet spells if you have them. It is also recommended to use the Elemental Siphon ability on the Draupnir Spear (hold R2) to receive a temporary resistance buff against Bifrost. He has a huge array of attacks, including but not limited to throwing Bifrost at you, slamming Bifrost in a straight line, teleporting at you and swinging in a combo, releasing Bifrost energy in a blast directly in front of him, jumping into air and bang in place. Many of these attacks can be dodged, some blocked/parried.
In addition to all of its other Bifrost attacks, it has one more lethal attack: an unblockable, full area-of-effect Bifrost attack that involves the entire health bar on higher difficulties. Fortunately, however, the latter attack can be stopped by throwing your axe/spear at it, but it's absolutely imperative that you do it in an instant, because if he manages to land this attack you could die in one hit.
In addition to any attacks he will perform, he will also teleport throughout the arena, constantly in close range to swing at you, then come back in range to attack from range, making it very difficult to land a combo. You can get aggressive and dump all your attacks and special abilities, trying to clear combos and not waste them when she teleports, or play more focused and wait until after an attack to punish her with these abilities. Either way, this is a tough fight, so be prepared.
Midgard, Tomba del Re: We are Hrolf
After defeating all 12 other Berserkers, the last tombstone at Tomb of the King in Midgard will activate. This is the toughest battle of all. Having level 9 gear is highly recommended. Switch to the lowest difficulty in Game Settings. Also go to Settings > Accessibility > Combat > Miniboss Checkpoints = ON. This will create a checkpoint mid-fight if you die. Also purchase a Resurrection Stone from the blacksmith, in the Special Items section.
For all other guides on the game, go here.


![Guides Sophia's Shop Guide [100%] - Persona 5 Strikers](/images/posts/1f5e1c7629d56d6c792ac770a5d6b182-0.jpg)