


CAUTION
The solution is based on the American version for PC of Age of Enigma: The Secret of the Sixth Phantom, so it is possible to find differences in the Spanish version and / or other platforms.
INTRODUCTION
You can choose between casual or adventure mode while you are playing. In casual mode, you will be guided through the game more than in adventure mode. Active zones are highlighted in random mode, but not in adventure mode. However, in the adventure mode, you are free to go wherever you want and there is a lot more dialogue in the game.
TUTORIAL
The game starts with our heroine, Ashley, having dreams about a specific house. He takes a letter from the mailbox, which has his name on it, but the wrong address. Inside the letter is a key and floor plans of the house he is always dreaming of. Ashley doesn't think this is a coincidence, so she goes to the address indicated on the letter. The address leads her to the house she sees in her dreams. Once the movie is over, there is a short tutorial, for those of you who have never played adventure games before or who still want to make sure you know how the game mechanics work. Move the mouse over the screen. When you move the cursor over the car door, it turns into a magnifying glass. This means that you can click on the car door to go inside the car. Do it. The keys are still inserted. Move the cursor over the keys and the cursor changes to a hand. This means that you can collect the keys. Click on the keys and they will be added to the inventory. You can use inventory items on things. Click on the keys in the inventory. The cursor changes to keys. Move the cursor to the glove compartment (near the center of the screen) and click. Ashley will use the keys on the glove box to open it. Very simple so far, right? Take the key to the house and its maps by clicking on them. Ashley leaves the car. Now, you will learn how to move in this game. Move the cursor over the steps leading to the house entrance. See how the cursor changes to feet and the words "move to the entrance" appear below them? This means that you can click here to move towards the entrance. If you click on the door handle, you will notice that it is locked. Use the key from your inventory on the door handle. Ashley will open the door. Collect the letter protruding from the tag, then enter the door. Ashley immediately meets a mysterious person named Nathan. It is too dark to see, however. You will need to turn the lights on him. On the ground here are three pieces of light switch. One is to Nathan's left, in the black shadows. Two are to the right of him, near the light switch. When you have all three pieces in your hand, use them on the light switch. Then, click on the switch to turn on the light. Nathan talks to Ashley for a while, gives her a pendant and explains that the Fraternity of Medium has chosen her to free the six ghosts who are prisoners in this house. Finally he points to the door leading to the first ghost.
GHOST COUSIN
Before entering the room on the left, examine the wall on the left. There is a closet, take the music score from the closet and then go to the room that Nathan came out of. Ashley sees the ghost while reading a book. If you zoom in on the book (on the table), you will notice some missing pages. You will need to find all six pages. Fortunately, they are all in this room. One is on the top of the cabinet on the left, one is under the sofa, one is under the carpet, one is behind a picture on the right, one is on the lower right chair and the last is in the corner of the lower cabinet to the left. Examine the book on the table and place the pages in the book. The book explains how to assemble a teal-colored figurine. Many pieces of the figurine are inside this room. One is in the fireplace, one is on the arm of the sofa, one is under the table and the last is above the cabinet at the bottom left. There are two puzzles in this room that have figurine pieces. One is the cabinet in the lower left area. Next to the board, there is a puzzle box. Zoom in on it to start the puzzle. This puzzle is simple: just swap all the tiles until you form a complete picture. Click on two tiles to swap them and when a tile is inserted in the right place, it becomes darker in color and can no longer be moved. Solve the puzzle and you will be given a piece of the figurine. Click on the arrow at the bottom of the screen to exit the puzzle. The other puzzle in this room with a piece of the figurine is in the piano. Zoom in on the piano and place the sheet music (taken in the hallway) on top of the piano. Four piano keys are red and you will be challenged to play the song of the musical score. Like a real piano, the further to the left a key is, the lower the pitch on the scale, and the further to the right a key, the higher the pitch on the scale. From left to right, the notes you will need to compose are:
1 - 2 - 3 - 4 - 4 - 2
By solving the puzzle you get a piece of the statuette. Leave the piano, then exit the room. When you are in the corridor, go to the end of it. The last piece of the figurine is here on the ground. Move the painting on the wall to get a rope. Open the drawer of the coffee table to get a lighter. Then, go to the closet (left). In the cupboard, you can collect two things: the liquid for the lighter and a light bulb. Leave the cupboard, then go to the kitchen (right). Here, too, you can collect some items. Take the knife that is inside a closet drawer, take the rag that is on the table and take the saucepan from the work surface. You can open the sink tap. Open it, then use the pot to fill it with water. Now, turn the tap and go back to the entrance hall. Here you can use the kitchen knife on the potted plant (on the right) to get twigs. Okay, now you have everything you need to complete the instructions in the book! Zoom in on the table and you can start. Put the base of the figurine in place. The book tells us that some kind of fire has to be started here and we have items in our inventory that allow for fire. Use the rope on the twigs, Ashley will bind them. Place them on the base of the statue. Now, use the combustible liquid on the lighter, and use the now complete lighter on the twigs. This will start the fire. Now, place the remaining pieces on the figurine. The book tells you in what order to do it. The first is in the center of the statuette. Then the jaw, then the two curved pieces on the sides of the head. Finally, put the skull on the head and one eye in the skull. The ghost wants to teach you how to use the figurine by pressing the two buttons on the eyes. On the base of the figurine, you have two buttons. Click on a button to turn it into a red dragon or a blue eye. First, turn the buttons into two red dragons, then click on the eye. This will cause an elevation. Second, make the top button an eye, then the bottom button a dragon. This will cause enlightenment. Thirdly, turn the buttons into two blue eyes. This will cause an earthquake. Finally, turn the top button into a dragon and the bottom button into an eye. This will cause darkness.
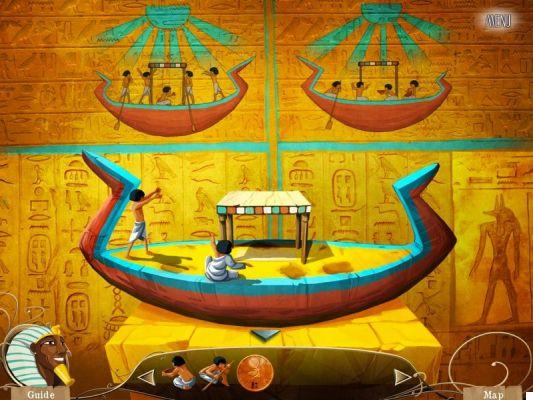
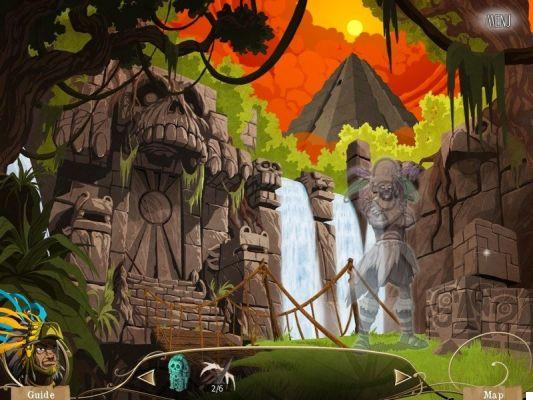
Once all four spells are performed, the ghost is impressed with Ashley and decides that she can help him. He grabs her hand and the game passes to Yumanco (the ghost) in a temple. Apparently, our ghost is the leader of a tribe. The ghost warrior here needs his spear. The six pieces of the spear are on this screen. One is in the upper structure on the left, one is in the skull eyes above the temple door, and one is leaning against the temple door. One is over the far right, in the left half of the bridge and another is on the rope over the left half of the bridge. The final piece of the spear is inside the puzzle cube, on the right. Zoom in on it and you will be challenged to guess how many cubes the structure is made of. The answer is 39. Once you have all the pieces of the spear, give them to the ghost. He will tell you that you will have to find the four great pains inside the temple. The temple door is closed, however. Use the figurine on the door, then use the elevation spell (two red dragons) to make it go up. Enter the temple. It's too dark to see anything here. Use the figurine on the lights, then use the lighting spell (blue eye and red dragon). The stairs have ten pieces of fresco on them. Five are yellow and five are green. Collect them all, then use the yellow fresco pieces on the yellow wall. A puzzle begins. Two of the five fresco pieces belong to the wall. The places where they go are highlighted. Choose the two pieces correctly, then hit enter. If you are wrong, you will have to solve the puzzle once again, only with different pieces of the fresco. Solve the puzzle to get a symbol, which is one of the great pains. Collect it. Now, use the green pieces of the fresco on the green fresco. You will have to do the same puzzle again and when you have solved it, you will get another symbol of great pain. Go up the stairs. Take the red pieces on the floor and use them on the red fresco present. You will have a puzzle similar to the previous ones, but slightly different. This time, all five pieces fit into the fresco. It is necessary to understand where they are going. Try each piece on the fresco, if you put it wrong, you will have to redo the puzzle from the beginning, only with different pieces. Solve the riddle that will give you another symbol of great pain. Here is a big hole in the ground, which prevents our character from reaching the blue zone. Use the figurine on the ceiling above the hole. Use the earthquake spell (two blue eyes) to make the rocks fall from the ceiling into the hole. Lift the blue zone and use it on the blue fresco. You can always solve the puzzle in the same way, do it to get the fourth symbol of great pain. Go ahead, to reach the top of the temple. The priest here is attempting to sacrifice the ghost's wife. Use the statuette on the priest and create darkness (red dragon, blue eye). The priest decides to sacrifice the statue in place of his wife. Zoom in on the altar. Place the statue in the center and then place the four pains in the four slots. Blue and brown on the left, red and green on the right.
SECOND GHOST
The first ghost leaves a key on the floor when released. Take the key, leave the room. Ashley has another conversation with Nathan, which seems to indicate that she is a prisoner. Go ahead, into the corridor. The cellar door is in front, but it's locked. Use the key on the door, then go down to the basement. It's dark in here. Do you see the broken light bulb? Use the kitchen rag on it to remove it, then put the new light on from the closet. Click on the switch (right) and the room lights will turn on. The next ghost is here. He wants something. Talk to her and try to give her something. She doesn't want him and retreats into the shadows of the basement. There are some items for you arrived here. One on the front shelf, some broken pruning shears. Inside the toolbox on the shelf, there is a hammer. Take the two. Also on the right, you will have a bag of coal. Click on it to beat it. Coal falls into the grate. I recommend that you take that lump of coal. Take the screwdriver on the left, just to the right of the pillar. It is inside a chest. Now, use the screwdriver on the grill. A puzzle begins, in which you will have to loosen the four screws. Use the right mouse button to loosen a screw and the left button to tighten it. The screws are fixed like this:
If you loosen the upper left screw, tighten the upper right screw.
If you loosen the upper right screw, tighten the lower left screw.
If you loosen the lower left screw, you tighten the lower right screw.
If you loosen the screw at the bottom right, it does not affect the other screws.
Thinking logically, if you want to loosen all the screws, you will have to do it in this order (up left, up right, down left, down right). Then loosen the upper left screw, then the upper right screw, then the lower left screw and finally the lower right screw. You may need to do this twice to solve the puzzle. Solving the puzzle allows you to take a screw and a lump of coal from the coal container you beat earlier. There is a vase in the corner of the room. Ashley notices that there is something inside. Use the hammer on the jar to open it. You get a piece of paper. Talk to the ghost who is in the shadows. Give her the piece of paper, then give her the coal. She will give you a drawing of a bonsai tree. There is a bonsai tree in this room. We need to cut it like the tree in the drawing. Use the screw in your inventory on the shears to secure them. Now, use the tree shears. You will face a puzzle, in which it is necessary to make seven cuts. Cut the three branches closest to the base of the tree, then cut the three branches in the upper left and cut a branch in the upper right corner. If you make a mistake, you need to restart the puzzle. The ghost decides that Ashley can help her and we are transported to the ghost's past. He wants to find the bridal suite so he can get married. Grab the pink leaves from the base of the tree, then go to the Zen Garden. Examine the garden sand for a puzzle. Which image is a correct aerial view of the garden? The answer is "C". Solve the riddle, light up the garden lantern. Now, click on the doors in the center of the screen to enter the bridal suite. This is another puzzle. As you can see, the room is a mess.
Start by clicking on the bed (or the bonsai tree) a few times to fix the problem. You can click on the bed or bonsai tree to see what the room should look like. This should help clean up the room.
There are many things for you to take.
1. The two broken pieces of the table, where the table should be
2. The two bowls, close to where the table should be
3. The three pieces of kimono (one near the screen, two near the bed)
4. The teapot on the candlestick
5. The teapot stand, where the table should be
6. The flour and its box, to the right of the bed
7. The flashlight, to the right of the bed
8. The incense stick and its holder, to the left of the bed
9. Two pieces of the table, one in the left corner of the bed and one under the blue pillow.
Okay, now that you have all the elements, it's time to fix the room up a bit. It is necessary to click on the bed, screens and bonsai a few times to clean them. Also, click on the top of the open door to make the curtain flutter. The picture of what the room should look like has a table with objects on it. Place the table between the two cushions, then place the two bowls on top. Put the teapot upright on the table, then put the teapot on the stand. Use the meal, the flour on its box, then put the box on the table. Use the incense on its holder, then put the incense on the table. The image of what the room must look like shows petals on the bed. Use the rose petals from the tree outside on the bed. The image of what the room must look like shows a kimono on the screen. Put the white piece on the screen, then the pink piece, then the red piece. Basically, it's about putting the pieces on the screen, from the largest to the smallest. The image of what the room must look like shows a stone statue on the cabinet. Click on the cabinet for a puzzle. It is necessary to determine which statue fits in the shade. The answer is statue number 3. We're almost done! Leave the bridal suite. Now, light the torch with the lantern. Then, leave the garden. Light the three torches, in the right order: first the one on the bridge, then the one on the right, then the one on the bench. Now you have to solve a puzzle at the counter. With this puzzle, you will have eight attempts to figure out where four stones go. All previous attempts are recorded, it will be necessary to use the best logic skills, in order to understand the solution of this random puzzle. By solving the puzzle, you will get an oil lamp. This is the last piece you need for the bridal chamber! Return to the bridal chamber and place the lamp on its holder in the wall. Use the torch to light the incense and the lamp. Then, put the flashlight in its holder on the wall. The bridal chamber is now complete and the second ghost is free.
THIRD GHOST
The second ghost leaves a rope behind. Get it, then go back upstairs. In the main corridor, go right through the door, which is now open. Inside is the third ghost, Murray the Pirate. Murray says he wants to clear this room first before talking to you. There are six vase pieces in this room, two on the table, one on the carpet, and three on the wooden floor. Collect them to get a complete vase. The vase should be placed where the small frame is (near the ship model). Take the frame, then put the vase there. The ghost sets fire to the carpet. Use the pot of water on the fire to get a key. The pot of water is in the kitchen, all you have to do is take the pot, turn on the water tap, then put the pot under the tap to fill it with water. Use the key on the locked display case in this room. This one has a clock with two drawers. Move away from the clock and use the frame on the wall above the ghost. Look at the photo and click on the area where you see the clock set at 5:55. Go to the clock in the window and set it to 05:55 by pressing the two buttons. A drawer will open. Take the sheet of paper that is inside. Then, zoom in on the shelf on the left and use the piece of paper on the last book. Ashley opens the book on page 13, where there is a puzzle. Swap all the pieces around, until the picture is reconstructed. It's a picture of an open book, with a clock inside. When a piece is placed in the right place, it can no longer be moved. Finish the picture and you will see that the clock in the picture is at 3:00. Go to the clock in the window and set it at 3:00. You will get a boat mast. Go to the ship model in this room and put the boat mast on the top left. This will open the windows, near the rear of the ship. Zoom in on them for a puzzle.
You will need to indicate numbers:
The second is half of the first
The first is the largest
All the numbers are different
The last one is less than five
We have four numbers available: 2, 4, 6 and 8; 8 is the highest, so it is the first. The second is half of the first, being 8 the first, the second is 4. The last two numbers are 2 and 6, since they must all be different and since the last one must be less than 5, it means that the last number is 2. The correct answer is therefore 8, 4, 6 and 2. The solution of this puzzle leads to a treasure. Use the treasure on the ghost. He decides that Ashley is able to help him and we are transported to the ghost's past. You are now on a beach. Pick up the berry on the compass in the lower right area and pick up the crab when it appears. Advance to the creek, towards the large rock formation. Here is a parrot with a pearl. Click on it and the parrot will fly away. Click on the pirate twice and you will get a rod and a rope. There is a hole in the wall in the center of the screen. Use the crab here and he will give you a map. Go to the branches on the left. It is an enigma. You will need to remove all the branches starting from the top one. Click on the branches. Do this several times to get rid of all branches. By solving this puzzle you will get the handle of a shovel. You will automatically exit towards the beach. Use the sand map for a puzzle. It is necessary to follow the nine movements of the pirate to reach the treasure. Notice that the X sign indicates a step forward, so mark all the Xs, in the right order. Do this until you have marked all nine Xs and find the location of the treasure. You will not have a shovel to dig and retrieve the treasure chest. Go to the ocean, the pirate will go underwater for up to thirty seconds. You will be able to see the key to the chest inside a large oyster and you will also see the head of a shovel. Pick it up and then head back to the beach. Use the shovel head on the handle. This will ensure that you have a complete shovel. Try to use it on the X that marks the treasure chest. The shovel falls apart. Use the rope on the shovel to strengthen it, then use it again on the X to get the treasure chest. The treasure chest is locked, you will need to use the key found in the oyster. But first we need to get the pearl from the parrot. Use the berry (from the beach) on the rod to make a makeshift fishing rod. Use it on the parrot to get the pearl. Take the pearl and dive into the ocean. Pick up the stick near the oyster. When the clam opens, use the stick on it. Now, use the pearl on the key. The pirate steals the pearl for the key. Go back to the beach. Use the key on the treasure chest to find a piece of a medallion. Take him and the pirate realizes that he is truly the queen's son. This is rather unexpected. Nathan reappears and talks to Ashley for a while.
GHOST ROOM
The third ghost will leave a hook behind it, use it on the rope left by the second ghost, so now you can go up the stairs to the second floor, just go to the main hall and use the hook on the dog. At this point you can go to the bathroom to help the fourth ghost, or you can go to the bedroom to help the fifth, the order in which you help them is not important. Inside the bathroom you can pick up half a red bottle on the shelf on the left, while half a yellow bottle is on the floor under the carpet and another half yellow bottle is inside the sink on the right. Zoom in on the cabinets above the sink and open the door on the left to get half a blue and half green bottle. A scare will await you when you step away from the lockers. Click on the shower curtain to see a pharaoh sleeping in the tub, zoom in on him and grab the blue, red and green half bottles; at this point you should have four whole bottles.
The pharaoh holds in his hands a piece of paper that shows four colors like these:
Blue - Red - Yellow - Green
There are four indentations in the bathroom floor, insert the bottles following the Pharaoh's card, then zoom in on the floor for a sliding puzzle. Move all four pieces until they are all in their correct position (marked with an x). Once this is done, the pharaoh will wake up and be surprised that he has not gone to the afterlife suspecting that something has gone wrong with his embalming process, then he will ask for Ashley's help to return to his own afterlife. The pharaoh will reappear outside his tomb; talk to the woman on the left who will challenge you to a puzzle, click on the card to start it; you must match each card with its opposite, the sun with the moon, the man with the woman, the water with the fire, the sand with the river, the ox with the wheat. When you solve the puzzle, the woman will give you a key, then go to the tomb, take the medallion on the ground and enter the room on the left, place the merchant's key with the others to start another puzzle. You will have to place all five pieces on the board to form a perfect cube, it is not necessary to rotate them; the pieces are: man - sun bird - human eyes - palm. Solve the puzzle by making a cube appear, then push it down and you will see that this will open a door, beyond which you will find a maze, the way to go through it is described to the right of the entrance, do you see the dots? From bottom to top the points are: left, center, center, left, left, right, right, left, center. Go through the labyrinth following this path, each of the nine rooms has a statuette, collect them all, in the last room you will also find a medallion to collect. You will end up in a tomb-like room, examine the boat on the left, this is a puzzle where you have to put all nine figurines on the boat. The pictures on the wall show both sides of the boat, the one on the left shows the opposite side of the boat, while the one on the right shows the side of the boat closest to you. Put all the figurines on the boat, when you put one in the right place, it will snap into place. Solve the puzzle and you will get an Ankh, use it on the door on the left, so you will have access to the tomb. The pharaoh will meet his mother who interfered with his embalming and who will tell him that he must perform a purification ritual to save his family. Grab the medallion on the ground, then zoom in on the sarcophagus where you will find various medallions to collect. There are seven statues in this room and you have seven medallions in your inventory, you will need to match them. Zoom in again on the sarcophagus, from left to right place the medallions of Isis, Thot, Horus, Hathor, Osiris, Anubis, Amon in the cracks. This will open the sarcophagus, zoom in on it for another puzzle; you will have to turn the discs until you connect the blue tubes with the two blue spots and the red tubes with the two red spots. This puzzle is random and once solved, the fourth ghost will be safe. Nathan will appear when you have helped the fourth or fifth ghost and wants Ashley to forget about the Medium Fraternity to join him.
FIFTH GHOST
The fifth ghost is inside the second floor room, you can do it before the fourth. The bedside drawer is bright, open it and click on the crucifix, the ghost will appear, a monk, upset because he does not have a bible. Click on the dog that will find the bible under the bed, then take it and use it on the ghost. He will be shocked because there is an evil creature inside the broken mirror. He will give you a fragment of the mirror, here you will find four, one on the ceiling, two on the floor near the bed and one under the covers. Zoom in on the mirror and you will find four more fragments, so now you have nine in total, put them in the mirror so as not to leave holes; the hardest piece to see is the small one on the bottom edge. Click on the mirror for a puzzle; you will have to put the mirrors on the screen so that all the numbers reflect each other, when the match is exact, the numbers will turn green. The mirrors will be positioned as follows:
7 7
5 / / 8
16/9
15 / / 10
16 / / 11
4 / / 12
14 9
15/13
By solving the puzzle, the poltergeist will leave the mirror, click on it several times to get rid of him and the ghost will be grateful for your help and will trust you. Ashley will go to the ghost's past, grab the piece of wood along the path, then continue towards the cloister. Talk to the dead abbot, take the four bottle pieces and the plate on the shelf to the left of the abbot. Go through the door to reach the prison, collect the scythe on the stairs and continue towards the cells, talk to the witch who will tell you that she can help the abbot. Put the plate in the special holder of her cell, she wants you to bring her some plants with sprouts like snakes, then go back to the countryside and use the scythe to get the red plants on the left, this will start a puzzle.

You will have 30 seconds to look at a grid at the end of which you will be asked a question about the grid, like: "What color is the plant in a certain square?" The questions and grids are random and you will have endless possibilities, answer a question correctly to get a flower. Go back to the witch and put the red flowers on the plate, she would like to use a pestle on them, use the scythe on the piece of wood to get it, then use it on the plants to start another puzzle. In this puzzle each plant stands for a number, you will have to figure out which number each plant corresponds to, the sums of each row and column are indicated and you will have infinite attempts. Once the puzzle is solved, the witch will ask you for more plants, so go back to the countryside to get some leaves at the top of the tree on the right and you will have to solve another grid puzzle to get them. Go back to the witch, put the leaves on the plate and use the pestle, you will get a Sudoku in which you have to place the tiles on the board so that each row and column contains 5 different symbols. The witch will ask you for a white flower, it is a garlic plant that is on the far edge of the screen and obviously will trigger a puzzle. Once solved, go back to the witch, put the garlic on the plate and use the pestle to get another numerical puzzle. The witch will ask you for the yellow flowers from the tombstone, which are protected by a grid puzzle, solve it, then place the flowers on a plate and use the pestle for another Sudoku. Fix it, then take the remedy and give it to the witch, also give her a bottle to put it in and she will ask you for a cork. Go back to the countryside, on the tree on the left there is a knot in the trunk, use the scythe on it to get some cork, then use the scythe on the cork to get a cork to insert into the bottle. Go back to the witch and give her the cap so she can finish the potion, then go to the abbot and give it to her. He will explain to you that the witch was actually an herbalist and compliment the ghost for finally overcoming his prejudices about her.
SIXTH GHOST
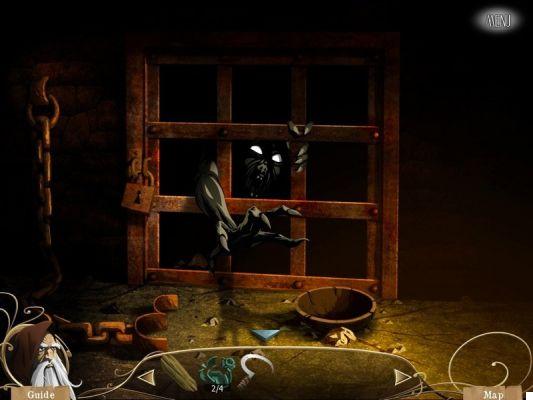
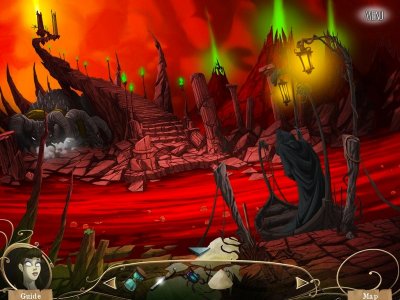
The fourth ghost will leave behind some plaster and the fifth a bottle of holy water, collect them. Now is the time to deal with the last ghost, in the last area of the game, the attic on the second floor. Go to the attic door on the left and use the chalk on it for a puzzle. You will have to figure out how many triangles there are in the staff, the answer is 30; when you are done, put the holy water on the door so you can open it, then enter to reach the attic. Ashley will take the soul pendant in the lower right corner of the screen, so use it in the spot in the middle of the candles to start another puzzle. You will have to untangle the ten circles so that the lines connecting the circles do not overlap, there is a drawing on the floor to help you; 5 circles go into the 5 corners of the smaller pentagon, while the other 5 go into the larger one. When it is finished, Nathan will appear, he is the sixth ghost! He was a medium until the Fraternity rejected him for his experiments with black magic; he wants Ashley to join him and when she refuses, he will send her to hell. Ashley's goal here is simple, she is to escape from hell. It will start near a tree, where there are various items to collect: a crow, a knife, a beetle, a piece of walking stick and an empty hourglass, there is also a lemon on the tree, but it is out of reach. Talk to the creature, he wants to hear from his brother Richard. Continue towards the Valley of the Soul, where you will find various items to collect, take the butterfly wing, the stick, another piece of walking stick and a heart, there is also an eyeball stuck in the rock, to get it you will have to use the knife. Continue towards the River Styx, the ferryman will not take you to the other side until you pay. You will have no money, but you have elements to collect: the clover, the sand, the stone, the rope and the third piece of the walking stick. Go back to the Valley of the Soul, if you click on the hands, a ghost will appear in the river, he wants three things: a heart, a beetle and some cloves, give him everything, then click on the hands again for another ghost. He will want three things, give him the eye, the crow and use the sand on the hourglass to give him a full hourglass. Click on the hands again for another ghost, give him the butterfly wing and the walking stick, you won't have a rotten fruit yet, but you can get it; go back to the tree and use the rope on the stick to make a sling, then use the stone on the sling and the sling on the fruit of the tree, then take the lemon. Go to the Valley of the Soul, the lemon you took is fresh, use it on the green smoke on the right which will make it rotten, then give it to the ghost who will leave. Click on the hands again for another ghost, it's Richard, talk to him, then go back to the tree and talk to his creature, it will give you a coin for your efforts. Go to the River Styx and use the coin on the ferryman, then click on him to cross the river. You are almost out of hell! Go to the gate for a puzzle, you will have to move the blocks to make sure that there are three matching tiles in the rows or columns, with each match the tiles will disappear, the trick is to move only the blocks horizontally. Keep moving the blocks and removing them from the board until there are no more blocks above the red line; you can reset the puzzle if you need it. Once the puzzle is solved, Ashley will leave Hell and return to the attic. Nathan, on the other hand, will be sent to hell.
 Age of Enigma: The Secret of the Sixth Phantom pc
- pc
- ipad
Exit date: December 2011


