


Please note:
The solution is based on the US version of the game. There may be divergences from the Spanish version.
Chapter 1
Open the doors in front of you by clicking on the handles. So talk to Tony. Answer the first question as you like, then say "All we got left? Meaning?" To the second. After the conversation ends, proceed to the stairs. You will find Margartet; freely choose the conversation options, they will not affect the result. Use "ignore" when it asks you to stop discussing a specific topic. So look at the mailboxes at the bottom right. The combination to enter is 7 on the left, 7 on the left, one on the right.
Then retrieve the letter in the center of the screen, as well as the piece of paper at the top left. Then go up to the second floor, talk to Dylan. Go down the hall, use the key to open room 202. Retrieve the letter from the floor. Answer the phone, then interact with the white dots that appear on the screen. So examine the table on the right, where a letter rests. Now it's time for the end-of-chapter quiz. The answers are: 1) Tony; 2) She had her own reasons; 3) From a guy I didn't recognize.
Footage - Story Trailer
Chapter 2
Press the white button on top of the alarm to make it stop ringing. After the skits, head to the door. Answer the phone. Turn on the TV, then press the button at the bottom left three times, tuning in to the news channel. Watch the news, then move back to the door. Talk to Tony, answering "Calm down, will you?". Then complete the conversation, you will automatically reach the corridor. Talk to Marie, answering all questions, and also asking all possible questions. When asked what Kyle is actually asking, say "You should check your room again". Reach room 206. Examine the mirror on the left; locate the ring between the mirror and the drawers. You will need something "fine" to be able to get it.
Then retrieve the measuring tape from the closet immediately below the painting, on the right. With it you can go to retrieve the ring, effectively "hooking it". Then talk to Marie again, letting the conversation proceed. Back in the hall, talk to Tony. Ask him "How did you find out about my past?". Then go up to the third floor. Talk to Dylan. Go up to the fourth, talk to Dylan again. Go to the door on the left, and interact with the handle. You will set off the fire alarm. Go back to the lower left section of the screen, examine the control panel there. Set all switches to "off" (at the same time).
During the skit that follows, answer "That's exactly what happened". Back in your room, watch television to stay up to date on the news. Talk to Charles, and during the conversation choose "What did you think had happened?". Then go to the bar counter. After the skit, go talk to Rex Foster. In the first round, answer any of the two options; to the second, you say "Well, there was something". So talk to Sidney, running out of conversation options. Examine the table, with associated newspaper. So it will be time for the quiz at the end of the chapter, answer: 1) Jeanie; 2) They had been called by Rex Foster; 3) Marie; 4) Dylan; 5) An incident 13 years ago.
Chapter 3
After the phone call, go and open the door. Answer his question with "Of course I remember!". After the conversation, go check out Kyle's suitcase. Recover the $ 380 from his wallet. You will then be immediately interrupted by Tony, who will ring the bell. During the dialogue, the phone will also ring - ignore Tony for a moment and go and answer that. Complete the dialogue with Tony, then examine the bottle located at the top of the drawers - it is full of money. Turn it over to retrieve them. So go up the stairs, up to 304, knocking on the door. Talk to Dylan, then replying "I need to smash open a bottle". Proceed further into the room, examine the puzzle on the wall to the left.
You will therefore have to reassemble it, overcoming a simple mini-game. Once this is over, Dylan will give the hammer to Kyle. Go down the stairs to room 202, examine the bottle. Use the hammer three times on it. Collect the money, then go down the stairs and give Mag the rent. So keep talking to her, exhausting all conversation options. You will then be given a puzzle to solve, based on crosswords. The solution is as follows: 1) Blue - "Iced", 2) Orange - "Cafe", 3) Purple - "Jukebox", 4) Green - "Lucky", 5) Red - "Beef". The secret answer is therefore "Juice".
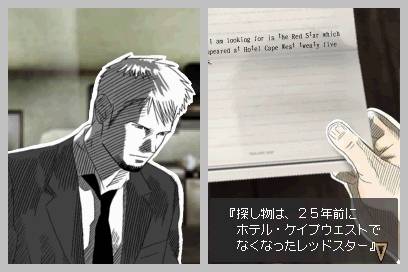
So talk to Sidney, who will tell you that the prize can be redeemed on December 23rd. You can then leave the bar. You will meet Marie, talk to her and ask "Are you in some sort of financial trouble?". Rex will come on stage, talk to him too asking "What business do you have with me?". Then proceed to the second floor, entering Kyle's room. Retrieve the insurance letter, between rooms 203 and 205. Then knock on 206. Talk to Marie and give her the insurance letter. After the conversation, go back to the bar. Talk to Rex, trying to figure out if he could be connected to the interception device recovered in Marie's room. You will then be automatically returned to your room. Dylan will ring the bell; after the conversation, go and examine the radio. Use the switch in the lower right to turn it on, then move the frequency up to 100.
Answer Rachel on the phone. So go back to the bar. Examine the Christmas tree. You can pick up the bug from the trunk. Talk to Rex again. Choose the answer "You don't fool me!". Then "She hasn't done anything to me!". So "Do you think she's committing fraud?". Then "I trust her more than I trust you". The scene will continue with Rex's escape; you will therefore have to answer the questions at the end of the chapter. The right answers are: 1) A hammer; 2) Rex; 3) A bugging device; 4) An insurance claim investigator; 5) She was suspected of insurance fraud.
Chapter 4
After the conversation with Betty, head to the stairs. Chat with Mags, running out of options. Dylan will then arrive on stage; when he tells you about his suspicions about Marie, choose to ignore him. Go back to 202 and listen to the recorded message. After the automatic conversation, go talk to Marie (room 206). Choose the following conversation options: "Look me in the eyes!", Then "Is Rex making this all up?", Then "Well, no, but ...", then "You have to make me believe".
So out of Marie's room, go to 202 and try to recover the coins from the piggy bank. Kyle will say he doesn't want to break it, so you'll have to try to "extract" them using the hole provided. Take the stick from the plastic crate at the top right, then go back to the closet and use the stick to extract everything. You will have to "jump" the coins upwards. Once you've extracted at least a penny, go and combine the letter in your inventory with it. Then move to the first floor, examining the mailboxes. You will notice that most of them have been sealed with tape. To be able to open them, you will have to press repeatedly and alternately on their left and right sides, until the tape "comes out". It will then be automatically resealed, luckily for you. So watch the scene with Kyle as the protagonist, and then go up to the fourth floor, meeting Dylan. After the conversation, interact with the control panel at the bottom right of the screen by turning off the whole. Therefore, examine the area on the left.
Then take a look at the box above the tools. Try pressing the lever, noting that it causes the cover to slide down. To keep it in place, you will have to use the stylus to bring it down, and therefore your "free" hand to pull the lever. You can now proceed beyond the fire door. Remember to position the doorstop so it doesn't close as soon as you leave. Then continue to room 404. Examine the cards scattered around the table to the right. You will have to try to remove the dust from one of them; to do this, blow into the DS microphone. You will recover a party invitation. Then talk to Dylan, go back to the second floor. Approach Frank, and ask "Is there a problem here?". After the conversation ends, proceed to the cellar, then continue to the laundry. Retrieve the recorder. Go back to the third floor, knock on room 302. Nobody will answer; then go to Rachel (room 202). Go back to the corridor, and go see who is in your room (201). Talk to Frank, saying "You won't find what you're looking for here", then "It was on the laundry floor". After the conversation, examine the papers scattered on the ground. Talk to Tony, then head to the stairs. Ask Dylan if he knows anything about the cards. You will then both have to go to Mags. Knock on his door. Exhausted the conversation options, proceed to the fourth floor. Open the fire door. Talk to Frank, inside 404.
Examine the table, noting how one of the drawers is open. Approach the door, you will be stopped by Tony. Ask him "You planning on ripping somebody off?", Then "You're expecting Frank". You will not get an answer. Then go to room 302, talking to Frank. So go back to Tony, answering "You're not a worthless human being!", And then "extort money from Frank!". So exhaust the conversation options to get all the information possible. You will now be provided with the cassette. Go back to room 202 and plug it into the phone to listen to it (via the answering machine - enter side B). In order to listen to it, you will need to press the "play" button and the "fast forward" button at the same time, as the tape is recorded at a slower pace than normal. After that, it will be time for the end-of-chapter quiz; the answers are: 1) Dylan; 2) Peter Rivet; 3) A secret code used in the hotel; 4) Kathy McGrath's murder; 5) Lost items connected to Condor.
Chapter 5
After the phone call, check out the "Red Crown" product cashier. Identify each object (by examining them one by one). Then answer the phone - your mother. So go outside. Knock on 201, Tony. Answer "Is there anything bothering you?". Then "Guess a guitar's pretty valuable". Therefore show him the wax (Wax). You will then get your first sale. So continue with Marie, room 206. She will tell you that she is ill; so go to the bar, and ask Sidney what's going on. So ask Claire, saying "What's Marie concerned about?". Go back to Marie, this time she will answer. Ask her about her safety, and then "Let's do something about it". From the inventory, show her the lock. Here is your second sale.
Now it will be Charles's turn, room 305. Say "Sorry to have bothered you". Then "What've you gotta take care of?". So "On second thoughts ... that's pretty bad!" and finally "I may have just the thing for you". Show him the sticker to complete your third sale. The fourth possible client will be Betty. Go down to the first floor to meet her. Ask her "Why the long face?". It will go away. So reach the laundry, examine the washing machines. The central washer will contain a stained dress. Reach 203, and during the conversation say "I have to confess, I have". Then "I might be able to help you out". Show her the cleaner to proceed with the sale. So go back to 202, use the phone to tell Ed the good news.
After the conversation, go to the bar to talk to Sidney. Watch the scene, then proceed to the fourth floor, continuing beyond the fire door (open). In room 405 you will see Dylan. Tell him "The culprit for what?". So examine the fallen stool at the top of the room; retrieve the knob from the ground. Examine door 405 (from which the doorknob in question fell). Examine the light switch; So keep turning the lights on and off quickly, until Dylan notices you. You will therefore be free to leave the room. So go back through the fire door. Reach the stairs, returning to the second floor. You will see Tony in the corridor. Talk to him, then to his laugh say "What's with all the smiles?". Proceed to your room (202). Look at the notice left by Mila. Then use the telephone, noting how the answering machine has recorded a message.
Upon hearing the message, you will automatically call Rachel. Move to the door, Frank will ring the bell. Answer his question with "I found it". So exhaust the conversation options, going to get a photo. Enter the inventory, select "Funeral Photo", examine it. You'll recognize Marie on the left, and next to her Rex. Go back to the corridor, and stop near 203, noticing Betty and Rex's exit. Talk to Betty, asking her about Rex. Then continue towards the bar. Ask Claire what table B is. Sit there and take a look under the table, retrieving the reward letter. After examining it, ask Claire who sat on that table earlier to figure out who may have placed the letter.
After that, go to the third floor to talk to Charles and Dylan. You will be involved in a long skit starring Kyle, Will and Dylan. After his ending, knock on Dylan's room door. Another little skit, you can then finally talk to Dylan. When it asks you about the letter, use the "Ignore" key. Dylan will get very angry, and you can keep getting information. Speaking of Mags, say "Did you think it'd be bad for you if she knew?". The end of the conversation will also mark the time of the end-of-chapter quiz. The answers to be provided are: 1) Sell items to two tenants; 2) Nile; 3) Rex Foster; 4) An old newspaper extract; 5) Mags.
Chapter 6
Watch the news, then turn off the TV. Make your way to the bar, then talk to Mags, who will come out of the elevator. Tell her "Has there been any trouble before?". Then try to enter the bar, noting how it is still closed. Then proceed to the vending machine. Insert (by taking them from your inventory) a few coins. After you have your drink, move up the stairs, back to the room. Talk to Tony, then use the phone to talk to Rachel. Exhausted the conversation options, so listen to the radio. Make sure that the frequency is positioned between 90 and 91. When it is 12, you will then return to the bar. Talk to Charles, then to Claire. Talk to Sidney too, then proceed to the kitchen to have a conversation with Claire.
He will initially ask you to open a jar for him. Move the stylus along its edge to try to do this (but you will not succeed). Then examine the shelves on the left. The rightmost jar of all is "surrounded" by a few layers of rubber; take them to get a new item that can help you. Combine the gum with the jar and you will easily be able to open it. Finally Claire will reveal the real reason why she called you. He wants to know if his father has a girlfriend. Talk to Sidney, this time it is not possible to get useful information for Claire; you will have to settle for some hints regarding a mystery about room 406. Go back to your apartment for now, 202. Talk to Marie along the way, asking her "What's going on?".
After the conversation, use the phone in your room. Talk to Ed about Frank's accident. Then go to the door, the doorbell will ring, it's Betty. He has to tell you about Marie. Exhausted all options, so go to 304 to talk to Dylan about the facts just discussed. Tell him "I want to check out a crystal". You can then retrieve the magnifying glass near the laptop, on the left. Dylan will be interrupted by a phone call; you will therefore have to open the inventory and combine Marie's ring with the magnifying glass, trying to examine it. You will notice the similarity between the "condor" on the ring, and the one marked on the sheet below, belonging to Dylan. Ask him about the drawing, then leave the room. Go back to the fourth floor, entering 406. Soon Dylan will join you.
Examine the objects on the left, in more detail on the photo at the top right. Remove (by completing an easy mini-game) the photo, under it you can see the condor. So go back to examine the pile of items on the left. Retrieve the photo album (the red book above the table). Now go to 203 and knock on the door. Talk to Betty. After the conversation, you will meet Charles right outside the door. Exhaust all the conversation options, obtaining the key to 205. Use it immediately to enter. Examine the upper left drawer, retrieving the item in its upper right section. It is a typewriter. It is necessary to understand the shape of his letters. Go "back" one screen, retrieving the paper from the drawers on the right. Go to the inventory, choose the sheets of paper and use them on the machine. Start typing, then turn off the upper case and try using the t. You will notice that it is crooked, just like the t in the offending letter. Go back to Betty, and begin the interrogation. Say "Did you borrow it from Rex?". Then use "ignore" to keep her talking. Ask what Rex will do in the room. Ask "Was it about Marie?". Then "Was it the tenants?". So exhaust all other conversation options.
It will now be time to "fill in" the final quiz. The answers are as follows: 1) About the Hotel Cape West emblem; 2) He was disgraced by Hugh Speck; 3) A ring; 4) A condor; 5) The "t" letter was slightly skewed.
Chapter 7
Approach the door, Mila will ring the bell. Talk to her, then on the phone with your mother. Go back to conversation with Mila, getting the gift from Rachel. Mila will also give you a gift from her, a painting. He will ask you to draw it, use the stylus and do your best. So go out, and tell Mila to take the elevator, while you will be interrupted by Charles. Give him the key to room 205, which he rightly wants to have back. So head to the elevator by pressing the button to its left. Press the R button at the top right to reach the roof. Talk to Mila. You will therefore decide to go down. Press 2 to return to the second floor; the elevator will stop. So try to break down the elevator door. Dylan will assist you.
Talk to Tony, saying "Sure, hand it over". Talk to Mags, then give her the package. Say "Sure, no problem" to the request to open it for him. Reach the table in the center to proceed, thus retrieving a gold watch from inside. To his subsequent questions, answer "Don't treat me like a fool!". Go back to your room. Talk to Rachel on the phone, then open the door to the postman. Examine the items inside the package. They will ring the bell again, this time Tony. Go down to the bar, talk to Claire and Sidney, asking the latter "What's so funny?". So go to the Juke-Box and choose the song that suits you best. Talk to Tony again. Then again with Sidney, who will suggest playing billiards, as it is necessary to wait for lunch. By winning, Tony will agree to perform a performance where you want. Then also play with Sidney and Claire, then go back to the bar. Talk to Will, saying "Do you want to drink with me?". Then converse with Betty; when interacting with Hyde, say "Don't mess this one up!". After a short dialogue, the food will arrive. Sidney will give you a recording, then you'll need to go back to 202.
Look at the recording. Make sure that the tip of the turntable is positioned as far out as possible, which is necessary to allow listening to the recording. After that, it's time for the end-of-chapter quiz. The correct answers are: 1) Mila; 2) The lighthouse; 3) A bomb; 4) A card, a baseball, and a key; 5) Will.
Video - Debut Trailer
Chapter 8
Answer the phone, then go and open the door (the bell will ring). Talk to Tony, then go check Rex's diary in your inventory. Answer the phone again, this time to Rachel. Then move to the bar, talking to Sidney. Give him the recording he had lent you earlier. He will ask you for help for Claire. You will need to speak to her on her behalf. It is located in the billiard room. Ask her "Are you still worried about your dad?". Run out of conversation options, then go back to Sidney. Ask him about the loans to Mags. Then say "So you can't tell me, huh?". Then ask about the Scarlet Star. Then talk to him again (after the conversation ends), obtaining information about the elevator.
Now go ring Mags' bell. Tell her "I'd like to hear about your husband". Enter his room, and say "I looked it up". So continue with "What's so funny?". Then continue with the usual questions. Analyzing the photo, say "You're the one on the right". Then continue with the questions, until Mags sends you away. You will find yourself in front of Dylan. Tell him "We talked about leaving this place". Go back to room 202, use the phone to talk to Rachel. So go into the inventory, choose the old photo album, and examine it. Take a closer look at the photo at the top of the second page. Then focus on the necklace. Exit the room, proceed down the hall to 205. Talk to Charles, who will exit the room. Enter with him. To the first question, answer "ignore". Keep hammering it using all the conversation options. Exit outside, go up to room 305. Talk to Charles, get the film. Continue the conversation, then return to room 202. Examine the sink in the center of the room; then more precisely the bottle, taking the red paper. Go back to 305, open the door, talk to Charles. Reach the inventory, show him the red card. Head to the bathroom, and combine the red paper on the light near the wall, just above the bathroom. The light will be covered by the paper. You will then begin to develop the photo. So save your game.
Then examine the track in the upper section of the bench next to the toilet. During the next mini-game, you will have to move the flashing point upwards, making sure that the film is adjacent to the liquid. Start moving it in both directions, when the photo appears you will have to quickly remove the film from the liquid to complete the operation. You will finally get a photo of Frank. So enter the inventory, and choose the 8mm film. Compare it with the photos of the residents. Press the "down" key until a photo of a man's wrist appears, with a watch. Then press the flash point to zoom. Press on the clock. So compare with Will's photo, until Kyle says "Bingo". So go talk to Will in 306. He won't answer, but Charles will come to the area. Charles will try to crack the door, but Dylan will come out. Talk to Charles again, he will tell you that he will remain on guard while you proceed inside. In the room, you will hear the phone ring. Listen to the message that will be left on the answering machine. Then examine the table in the lower section of the room. Read the newspaper, noting the date (1955). So take off the first page of the newspaper itself.
Now take a look at the black container on the table. Charles will knock on the door; wait until no more footsteps are heard outside, remaining completely still. Then move to the closet on the left, examining it. There is a chest, but you won't be able to open it for now. Take a look at the right section of the closet, examining the gray jacket in the center, inside which will be the key card. Go back to the table, then choose the magnetic key from the inventory, thus opening the black container. So examine the black agenda inside. Also retrieve the letters and the camera. Then move to the mirror, in the upper left section of the room. Examine it, noting any footprints. An automatic zoom will be performed. Turn the hot water tap, letting it run for a while; a series of numbers will appear on the mirror: 067792. Go back to the wardrobe, enter the code in the lock of the cashier. Look inside the passport. Charles will knock, so don't move until you run out of steps. Go back to the table, examine the black chest again, then the camera. Turn it twice; you need to enter a code. Enter the date marked on Will's passport - November 28, 42. Then press the arrow at the bottom (right) of the screen. Then press the button indicated by the flashing point until the rear of the machine opens. Retrieve the broken postcard. Will will point a gun at the back of your head. Answer "Nice try. I'm onto you!". So "You faked your identity". Then "In the safety deposit box". So "Will McGrath". Now go into the inventory and show your passport. Keep hammering it, running out of options. Then say "Because you're the victim's son". Now show the broken card, and keep pestering him with questions. Say "You're looking for the culprit!". So continue "So the order sheet was your doing!". Now, again from your inventory, show the group of letters. Continuing the dialogue, you say "Michael McGrath?". Then "Mrs. Patrice?". Then proceed to ask the rest of the available questions.
Exit room 306, and talk to Charles. There will therefore be the quiz at the end of the chapter. Answer: 1) To reporter; 2) George; 3) Mags; 4) That he was using a false name; 5) He wanted to avenge his mother's death.
Chapter 9
Use the phone to call Rachel. You will be immediately interrupted by someone knocking on the door. Talk to Dylan (exiting your room). Answer "You're worried about what was said, aren't you?". Mags will arrive on the scene. After the conversation, the 202's phone will ring, go and open it. So, turn on the TV to watch the news. Exit the room, proceed down the hall to meet Tony. Answer "Did you see somebody".
After the conversation, go knock on room 206. Tell Marie "Are you all set to move out?". Ask for Rex. Which will arrive almost immediately on the scene. After the skit, go to the elevator. Climb up to the roof, locating Marie on the left. He won't talk to you, so use the elevator to go back to the second floor towards 206. Examine the closet just below the bathroom. Then try to "press" the shoe containers, and also all the clothes. Look at the chest at the top of the closet. Use the clothes-covered stool (retrievable from inside the closet) to reach her. Retrieve the hat and sunglasses. Also read the blue letter. Exit 206 and go back to Marie, she is now next to the lighthouse. Begin the interrogation. Show the hat, sunglasses and letter. So choose to say "Instruction for you to follow". Now show the ring, and say "Why would you sell something so valuable?".
Marie will then run to the edge of the roof. You will have to pass a mini-game to prevent him from jumping. So wait for him to turn his back, close the DS for a few seconds and reopen it immediately afterwards. You should be able to get it. The dialogue will continue, say "Who do you mean by" those people "?". Then exhaust all the conversation options. Rex will come on the scene. Start questioning him too, saying "Are you talking about Jack Green?", Then "Nile". Keep running out of options. Talk to Marie again, who will leave. Go back to the elevator, and go back to 202. You'll notice Dylan outside his room. Talk to him, saying "Rex won't be coming round here anymore". Then continue with "No, he didn't". Call Rachel from your room. Then, walk to the door to hear the doorbell ring. Talk to Frank, saying "I know your name came up in internal investigation", then "Why so surprised". Therefore, the conversation options are exhausted. Approach the door again, this time Marie will arrive. Reach 206, try to talk to Dylan - he will run away. Knock on 206 to talk to Marie again.
After the conversation, go to 304 and knock. Talk to Dylan. From your inventory, choose the threat letter. Then say "Keeping tabs on Marie!". So "You've never been to her old house!", And then "It was Nile!". Finally "Her brother and husband working for Condor". Then continue with the rest of the questions. Go back to 206, reporting the latest events to Marie. Back automatically to 202, try going to Mags. He won't answer, you will go back to 202. Frank will call you. A conversation will start; when choosing the question, you say "Hugh Speck?". So reach the stairs to the first floor, Kyle will hear someone coming down the stairs. Talk to Frank, then get off. Enter Mags' room, entering the door on the left, towards the bedroom. Take the piece of paper from the top left table. This is a piece of the letter of threats.
Then take a look at the lower left cabinet. This is a music box, open it to see a key stuck. It will now be necessary to solve a puzzle. First, place your DS vertically. Move the non-touch screen to close the DS, but don't close it completely. You will hear a click and the music will stop. Open it again slightly, stopping when the music starts again. Let the cylinder proceed to the hole, then stop the music when it matches it. Press the R or L button. A flashing dot should appear, keep your finger firmly on the L or R button and re-open the DS fully. Only now will you have to press the flashing dot. You will thus obtain the key. So examine everything else in the two rooms around you. Then continue to the bar, talk to Frank, then to Tony. Go to the fourth floor, where Tony is. Talk to him, then go back to 304 and take a look at the chest next to the fridge, retrieving the key from it. Go back to the fourth floor, talk to Tony again, who will give you a torch. Enter 406, using the keys to unlock it.
Move left, locating the lock. You will therefore have to answer the questions at the end of the chapter, the right answers are: 1) Dylan; 2) Her brother and husband working for Condor; 3) To watch Mags and find clues about the Scarlet Star; 4) Michael McGrath; 5) A key with a Condor mark.
Chapter 10
To free yourself from the ropes, you will need to slowly move Kyle towards the lighted table in the north section of the room. When the vase falls, retrieve the pieces to cut the ropes. Then examine the door, then the chairs on the left. Make the chair interact with the door, tearing it apart. Go out and wake Tony. Retrieve the iron bar from the ground.
Go back to 406, use the bar on the lock. Unfortunately, the box will be empty. But take a look at the door on the ground, on the corner you can find a book, McGrath's diary. Go back to 202, use the phone. After the conversation, avoid talking to Frank immediately. Go to Mags' room instead. Fran will come; go back to 302 and talk to him. Say "Michael McGrath's son", then "Did you help him get in?", Then "Told Condor about your plan". The time will now come for the "decisive" questions. Choose "What was your plan 25 years ago?". So "What went wrong?". Then "What kind of agreement did you have?". So there remains only one question "What was it that happened to you?". Now go back to room 202, examine the package brought by Jeanie. Get the car keys, go back to 302. Talk to Frank. After the conversation, knock on Mags' door. Talk to her, starting the series of questions. You start with "Is it because your husband was Condor's ringleader?". So "Geroge Patrice!". Then "To find people to buy the jewelery". So "Michael wanted out of the stolen goods trade?".
After the conversation, you will need to find the differences between two photos. Circle the second circular window, visible upstairs, in the right section of the photo. It is therefore assumed that the hidden chamber is located between the elevator and room 405. Proceed towards the fourth floor and reach the places corresponding to the circles traced on the drawing. After that, combine the two pieces of the postcard. Examine it, noting all the symbols written on its back. Enter the elevator, use the key to unlock the cover that corresponds to the fourth floor. Flip the switch. The code to insert is the following: first floor - 3; second floor - 1; third floor - R; fourth floor - open the door symbol; second floor - 2; sixth floor - close the door symbol. The elevator will move to the secret floor. Examine its right section, where the bench is located. A hole will have appeared, where to insert a key. Insert the condor key. Enter the secret room. Examine the table in the upper right corner, more specifically the cards above the table. Put them in your inventory. Then take a look at the drawers, from which you can get a photo and a police badge. Take a look at the painting on the left, next to it is a switch. The lighthouse in the picture will "turn on". Then move to the right, examine the photo there.
Exit the secret room, in this way Kyle will proceed to the elevator automatically, up to the roof. Then proceed towards the building slightly to the right of the lighthouse, moving to the point where you will notice the appearance of the icon in the shape of a magnifying glass. Examine the area, the brick wall; you will notice that the shadow points towards a particular brick. Press on it, noting how new it is than the others. A very simple mini game will allow you to remove the brick from its seat. You will get the Scarlet Star. Mags will arrive on the scene. Exhausted all conversation options. When you regain control of Kyle, knock on all doors to find out about your roommates' plans. Head down to the first floor for a skit. Move slightly for the next one, which will also correspond with the ending of the game!
Video Solution - Playlist
Click here for the playlist!
Video Solution - Introduction
Video Solution - Chapter 3
 Last Window: The Secret of Cape West ds
- ds
Exit date: 17 September 2010


