


The Operation Heart of the Night Raid is The Division 2's first endgame activity requires a team of 8 players. There is no difficulty scaling as in normal missions so it is not recommended to attempt completion in fewer players. The raid entry requirements are as follows: reach level 30, unlock World Tier 5, and acquire an equipment score of at least 490.
Complete the raid he will need to coordinate with his teammates, assigning roles and positions. The first in the world took 5 hours to beat even the last boss and we want to help you step by step to succeed in the enterprise with this guide especially now that no form of matchmaking has yet been implemented.
Despite CERA's efforts to contain the outbreak inside Washington National Airport, the situation quickly became unsustainable. The airport was filled with DC-62s and abandoned, until the Black Tusks arrived in DC and decided to settle there.
The Division 2 Operation Heart of the Night - How to start the raid
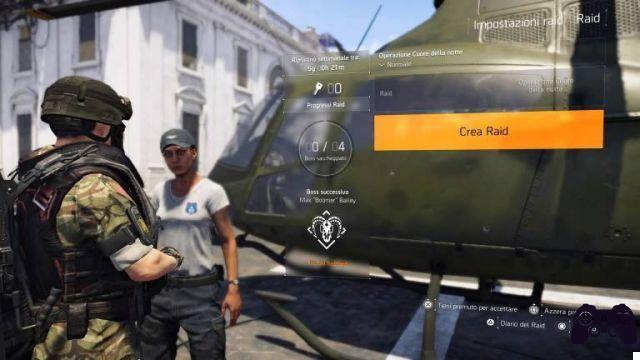
Ubisoft and Massive have confirmed that at the launch of the raid it will not be possible to join other players through matchmaking so to start it will be necessary talk to the helicopter pilot who you can identify in yellow on the map. This will unlock a new specific tab for the raid where you can start grouping friends or people nearby. The player who creates the group is the leader and the only one authorized to start the operation.
Operation Heart of the Night - First steps
The first part of Operation Middle of the Night is very straightforward and has no special interactions. Keep shooting at anything that moves. The level of the enemies will be tough, but it is nothing impossible if you are equipped.
You will be immediately transported to an entrance to the sewers. Proceed towards the orange indicator without worrying too much, until you get to the point where you have to climb using ropes. As soon as you put your head out, you will find yourself in the Washington National Airport terminal.
In this section you will face the first group of enemies, then split into two groups to cover both sides, stay in cover and watch out for drones and enemies that will try to take you on the flanks. Do not hesitate to make use of Restorers Hives if the need arises.
Also pay attention to the rear as a second helicopter will arrive with enemy reinforcements. Don't underestimate the Hounds of War. Once all the enemies have been eliminated, you can continue until you reach the area of the first boss fight.
Max “Boomer” Bailey Boss Fight
You will arrive in a waiting room with a coffee shop in the center. Here you must first take out all the enemies you find to lure Boomer into the room. As you can see, the boss is immune to all your hits. What can initially hurt him are the two machine guns placed respectively at gate 45 and gate 41. The goal is then to lure him so that he has his back to one of the machine guns so that the person responsible for firing can hit the red backpack.
The person who will have the task of shuttling between a thinking machine gun and the other will be the one identified by a red eye, also visible in the group interface and accompanied by the name Boomer on the right of the screen. Prevent the machine guns from overheating, which are destroyed or bothered by EMP discharges because you have to be fast and accurate. If both machine guns are destroyed or the squad dies, the mission fails.
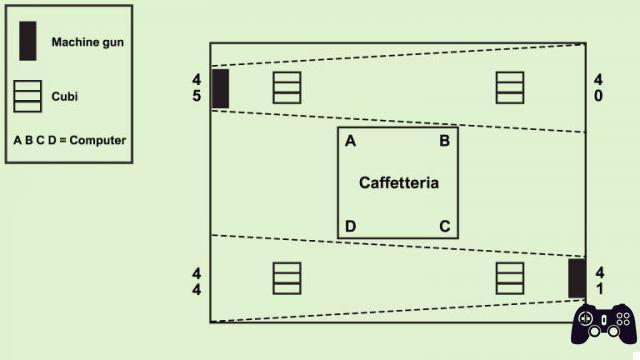
When the backpack is blown up, Boomer kneels and is hit on the head with all he can. After a full round of damage, Boomer stands up and temporarily disables the machine gun. To inflict new damage, he will then have to rotate towards the other location. The boss will also try to recover the lost health: when the plate on the chest turns green, shoot quickly by any means to prevent it from regenerating.
All you have to do is repeat until he has lost his entire life. To make things even more difficult, however, you will also have to pay attention to the defense systems that will periodically try to get back online. The ISAC will warn you and you can anticipate activation by interacting with the laptops in the central area. To understand which computer to disable, just look at the screens at the top.
If you fail to block the defense systems from starting, you will find cubes in the room that emit a blue glow. These are shields that make it impossible to hit enemies who are inside the area. To destroy them you will have to rely again on positions with fixed machine guns.
Identify the Expedition - Ben "Weird" Carter and Carl "Recoil" Dawson
The “identify the shipment” step requires the players to be split into two teams. The first team will descend from one drop point, while the other half will use the other. The fight will not begin until you have coordinated to simultaneously activate - within at least five seconds of each other - the terminals on both sides of the plane. This is a great time to talk and plan your strategy. So remember to tell the manager of the other team in advance which of the three control panels is on - you will recognize it because it will be green and with the word WAITING - so that he can activate the same device.
Each group will have to deal with a boss, meanwhile a purple smoke will have invaded the room. This smoke applies a debuff. To be able to reset it, you will have to constantly monitor the control panels, coordinate and press the right terminal together with your partner on the other side of the room. If everything is done perfectly, an orange smoke will radiate the room making the enemies weaker to our blows. At this stage it is essential that it is clear to everyone what the three control panels are called: you can help yourself with numbers, with directions or even by referring to the plane and calling them tail, center, head. Choose the method that is easiest to remember and understand.
Oliver "Rogue" Gordon
As soon as you kill Carter and Dawson, Oliver "Rogue" Gordon will take the field along with other mobs. The ideal is to kill both Carter and Dawson at the same time, so as not to overcrowd the room with tough enemies. Meanwhile, the area of the panels will no longer be available forcing you to face enemies in cycles. When the smoke is purple, keep a low profile and take cover if you encounter any difficulties, when it is orange try to inflict as much damage as possible to the boss. Don't forget to keep the area clean, securing the area.
Reach the DDP-52 Razorback - Buddy and Lucy
When you have finally killed the Rogue, force open the elevator and climb the rope. Go through the wingspan of the aircraft, enter the room and exit the door that leads outside. Drop into the courtyard and continue following the marker through the quarantine area. Kill all the Black Tusks you meet along the way. Go up the escalators to the Duty Free area and wait for the shutter of the gift shop to open. Here you will find Buddy and Lucy. Buddy is the healing robot while Lucy is DPS.
The peculiarity of the encounter is that their life is connected: a white indicator - similar to a rectangle - will appear above their health bars and will move gradually. It is necessary to take them down at the same speed and do substantial damage over time while staying within the range of the indicator. The strategy is to break up the robots and keep an eye on the two health bars to dictate the pace, better if only one player takes care of giving instructions to the others. If you are unable to keep up the pace you will receive a warning from the ISAC of an impending overload. Two players will then have to run to the center and interact with the laptops, otherwise the two robots will have to fully recover their energy.
The fight really requires a lot of attention and timing, in particular Lucy has a devastating attack that hits 360 degrees instantly killing anyone in her range and not in cover. Since there is only one resuscitation kit per head to use when the player is completely exhausted, it is essential not to expose yourself too much. The peculiarity of Buddy is that he will frequently heal himself, forcing to concentrate the damage sustained on him in order not to escape from the overload window, if this were not enough, in the middle of the fight he will also release the search mines.
DDP-52 Razorback - Boss finale
This fight marks the final showdown of Operation Heart of the Night. Within the large arena represented by the airport it is important to keep in mind some spatial points: towards the center of the area there are devices similar to generators that will report numbers. From these positions a circle extends outwards in which you will have to position yourself to capture the generator - make sure it reaches 100% charge. In the corners of the map are also four numbered SAM turrets that enemies will attempt to activate.
Initially the team will be divided into four two-person teams in order to cover all objectives. Once you have captured the areas, the Razorback - the large armored vehicle you will find near the generators - will let out some drones. At this point, two red light openings will be visible: one in front and one on the back which will need to be shot. Once destroyed, air vents will open in which to throw grenades. If you did everything right, the opening from red will turn green and you will see a tall panel rising from the center of the Razorback. Once it is fully extended and has assumed the shape of a tower, you can abandon the positions near the generators.
Read also: What is the best Game as a Service of the moment?
In this phase you will notice that there are weak points on his tower, in the outer area of the "wings", which you can shoot at. Destroy them to expose the Razorback's battery and start doing damage to the boss. Watch out for the missiles that come to you and clean up the drones as soon as possible. It will be necessary to repeat the whole process at least four times, destroying the various weak points and paying attention to the elites who will try to reactivate the SAM turrets. Once your health has dropped to zero, don't sing victory again as you have just entered phase three.
Each two-person team will need to go to their respective SAM station and destroy the manual control panel with your own weapons following the numerical order (1,2,3,4). After this phase you will have completed all the steps of Operation Heart of the Night. Happy loot!
Looking for the best PC build to play The Division 2? You can consult our guide. If, on the other hand, you are undecided about the purchase of the game, we advise you to read our review from which we have extrapolated an excerpt:
The Division 2 is the best launch of a shared-world shooter heavily focused on loot - it's massive, fulfilling, comprehensive, and from here it can only get better with new content.
Buy The Division 2 Gold Edition at a discounted price on Amazon.


