


Continue our guide to the Hirata Estate of Sekiro: Shadows Die Twice. From here we proceed inside the estate itself, amidst further dangers and powerful enemies
It's done, you entered the Hirata estate through the path into the cave, from where we left off with the first part of the guide on the area in Sekiro: Shadows Die Twice. This second part of the guide starts from the main courtyard of the estate, up to the encounter with the boss at the end of the level.
The memory has entered the heart of the action, and now ours Lone wolf he has to contend with much stronger enemies than before. But don't despair, with this guide you will be able to escape unscathed from the enemies and find all the objects in the area!
At the end of the path in the cave, you will find yourself having to jump from wall to wall to reach the top of the passage. By doing so, you will find yourself right inside the Hirata estate.
Main Atrium - Sekiro, Hirata Estate | Guide (Part 2)
On the top of the well that acts as an access passage, you will find someoil near the building, after which you can sit at theIdol of the Sculptor of the area. Many of the buildings you see will be engulfed in flames, severely restricting your freedom of movement. Following the left wall you will find yourself face to face with some archers: take them out to continue undisturbed.
The burning buildings give way to a large path patrolled by many enemies - use the grappling hook of the shinobi arm to climb over the few intact rooftops and get a better look at the area below. A great pond separates the main entrance, but the blazing fire prevents you from quickly passing it: you must, in fact, eliminate the two annoying archers, the two bandits armed with torches and a bandit armed with an ax.
To make things more difficult, two other bandits will be able to hear the noises of scuffling due to the clashes, and come to support their teammates. Remember to collect the Spirit emblem present, together with the Refreshing powder placed in the room with the armor exposed, e Divine confetti in the adjacent room, but be careful as there may still be a bandit alive. Once the area is cleaned, retrieve the fragment of pottery on the islet.
Juzou the Drunkard mini-boss fight - Sekiro, Hirata Estate | Guide (Part 2)
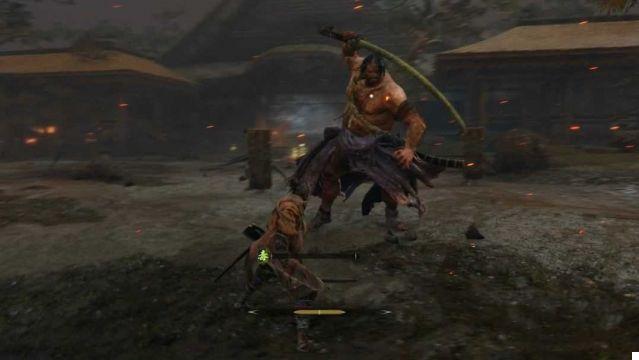
At this point, continuing, you will come across a mini-boss, Juzou the Drunkard: a mighty enemy, with whom frontal attacks will be of little use. He is accompanied by other bandits, against whom you can launch an attack and escape - a tedious tactic that will allow you to take no damage, and then focus on the main enemy.
NOTE: : against the mini-boss Juzou the Drunkard, you will find a man on the shore of the pond: these will give you a hand in battle. Unfortunately, he is not very smart, and will soon be defeated by the enemy's powerful and poison-type attacks, but he is a good diversion, allowing you to attack Juzou without being attacked himself. If you want to defeat the mini-boss without help, remember that you can hire the man later: it will be useful for clearing the area of enemies.
If you choose to take the stealth route, head to the farthest part of the pond and enter the nearby building - you can even get there unnoticed if you can hide yourself well. There's a lightweight pouch to be collected in the room, together with a bandit; another will wait in the outer courtyard, but remember that you can throw a shard of pottery to ambush the enemy.
With both enemies defeated, you can keep close to the wall where you will find both Juzou and his minions. Attack and run for cover to quickly defeat the mini-boss minions, or lure Juzou away from other enemies to separate him from reinforcements.
When you come face to face with the huge enemy, you will notice that he has a tendency to drink some kind of poisonous broth, which he will spit on his blade to make it toxic, or he will spit at you to hit you directly. It will be helpful to have an antidote on hand. The moment he drinks the poison and soaks his blade with it, it will be vulnerable to attacks from our Wolf: attack him relentlessly to cause him as much damage as possible!
The large tonnage of Juzou the Drunkard suggests that he can also be a sumo wrestler: in fact he will often attack with thrusts and thrusts that will do you a lot of damage; he will also often use his blade with powerful thrusts and two-handed charges!
His most frequent attacks, however, involve sequences of sweeps with the blade, with an attack that you will have to jump to avoid hitting you. If he moves his hand back, he will make two quick attacks in sequence; if he moves both hands back, he will charge you and try to grab you - be very careful.
Since its size is very impressive, each attack of Juzou the Drunkard successful will cause considerable damage to your posture too: a tip is to do a couple of attacks, move away and recover your posture, then return to the attack with another couple of attacks.
Once you've removed a dot from his life bar, it may be a good idea to hire the man by the pond - this way your enemy will focus on the newcomer, allowing you to focus attacks on his mass.
Once your enemy is defeated, he will reward you with a Rosary grain it's a Raw sake. Now that Jizou the Drunkard has been defeated, the entrance to the main building is free.
Reception Hall - Sekiro, Hirata Estate | Guide (Part 2)
Be careful when entering the main hall - there are still bandits in the area, along with a few archers, who will be patrolling the corridor. In the room on the left you can collect a Fist of Soot, and in the adjoining room some Tablets. Be sure to also check the end of the left wall, where you will find some bandits and someoil. The road is closed now, but how to continue?
Look at the wall with a drawing, approach it and the Lone Wolf will be moved to the next room: this wall is a hidden shinobi sliding door, and the one where you will find yourself now is a secret room! You will notice this from the amount of objects present, including a Mibu ball of Wealth it's a Lightweight bag. The room below will contain a Divine Confetto and a casket on the opposite side of the room which will contain, instead, a very precious one Rosary grain.
Since the previous path has brought you to the dead point, go back and go to the larger room on the right: here you will find theIdol of the Sculptor of the area, along with a Mibu Sphere of the Soul in the adjacent room. There will also be one here woman crying, the same woman who, three years later, will give you the Young Lord's Rattle that allowed you to enter into memory. He will ask you to help his son Inosuke and find Lord Kuro, imprisoned within the estate.
Continuing down the main corridor, an archer will shoot arrows at you: you can dodge the arrows, or let him get close and ambush him. Once you have overcome the obstacle, you will find Inosuke Nogami, once again wounded, who warns you that the boss is ahead: this enemy will use illusions that can be wiped out using a Seed of perception, donating you have one.
In the next room, observe the tatami in the center of the area: move it to discover a passage that will take you into an underground tunnel: you will have to use the Key to the Hidden Temple that he gave you Owl to open the door, otherwise locked. What will appear in front of you is the boss-fight at the end of the level.
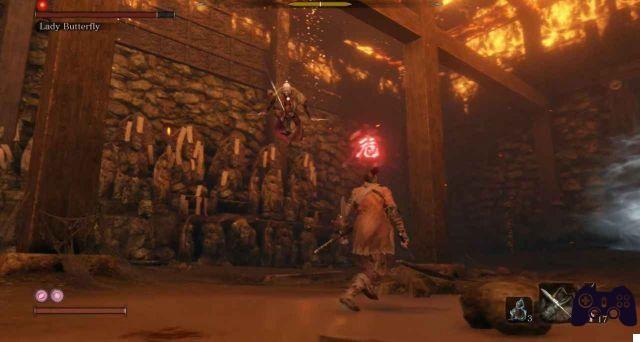
Boss-fight: Moth - Sekiro, Hirata Estate | Guide (Part 2)
This fight will take place in a Hidden Temple in flames: in the center there will be the Moth with only one life bar, but an incredible speed of recovery of the posture. For this reason, an effective tactic is to focus on lowering your enemy's life bar, rather than making attacks against their posture.
The clash with the Moth it's very tough, with the enemy being able to throw spiky kunai at you from long range. If he charges the shot, he will throw a series of kunai and then come close and attack you hand-to-hand. There Moth he'll also use ropes to get away from the fight and throw more kunai at you, or jump into you and make attacks that can inflict a lot of damage. As it approaches, the Moth alternate attacks with knives to a series of kicks, which will end with a loaded attack that, if it hits the target, would also cause a lot of damage to your posture. Also beware of running the Moth, which you can avoid by jumping.
By throwing the shuriken, you can prevent the Moth get away from the fight, as well as make it impossible for them to rise: accuracy and timing will be essential! When you stop her from jumping, the enemy will fall, making himself vulnerable to attack.
When will you manage to remove the Moth half life bar, you can focus your attacks to lower the enemy's posture, remembering to stop them from flying by attacking them with shurikens. She will become more aggressive, so you will have to block every attack from her to avoid taking massive damage.
Even though it may seem, the Moth is not won! As the wounded Inosuke warned you, the enemy has abilities that allow them to create multiple images of herself: her body will disappear giving way to many ethereal figures who will attack you with sharp knives and spears.
It is not worth fighting with illusions: you can follow Inosuke's suggestion, using the object given to you, that is the Seed of perception, which will immediately take away the enemy illusions. Unfortunately, you will only have one chance to use the item, as you only have one available: if you lose the fight, you will have to try to recover some of them in the surroundings of Ashina in an advanced area of the game.
Do not despair: the illusions will vanish after some time on command of the Moth itself. Be careful though because it will immediately attack you from above with a very powerful attack, so run into the arena to avoid it. When it stops, the second part of the fight.
La Moth it will summon a small group of flaming butterflies, which it will throw at you like projectiles. Meanwhile, she too will lash out at the Lone Wolf: you will have to watch out for both the fiery bullets and the attacks of the Moth. You can use shurikens to keep her from jumping, as you did before, and from time to time the enemy will invoke copies of herself to disturb you.
Beware of his charged attack: at this point in the fight the Moth will use his charged attack which consists of a combo of kicks in succession, very difficult to block. If you can block all the kicks, you will inflict massive damage to the enemy posture. The series of kicks will always end with an area attack, so jump on your opponent to save skin and inflict further damage to posture at the same time.
Take your time to win the fight - don't worry if her posture bar resets when illusions take over - you'll have the opportunity to destabilize her once her life bar goes down. Remember that with shurikens you can stop her from blowing up, and you will win the fight!
At the end of the battle, deliver the final blow and end the fight - the reward for defeating the Moth will be the Remember: Moth, together with a very precious one Cherry dew which will grant you an additional resurrection.
End of memory - Sekiro, Hirata Estate | Guide (Part 2)
After the battle, the memory of the night at the Hirata estate will end, and another clue of the Wolf's power will be revealed. Our protagonist will then wake up at the initial temple, and you will be able to talk to him Sculptor about what you felt. Don't worry if you've left something unfinished at Hirata estate, you can come back whenever you want, thanks to the fast travel.
Maybe now you want to share the Raw Sake with the Sculptor: will he have any stories to tell? Or, you can go on your own way, continuing towards Ashina Castle.
Discover other valuable guides!
Hoping that this guide to the Hirata Estate for Sekiro was useful to you, I refer you to the pages of Holygamerz to stay constantly updated about FromSoftware's title, Sekiro: Shadows Die Twice. Don't forget, if you like, to leave a comment to let us know how you managed to get through the area Hirata estate: how many times have you been defeated?
Don't forget to take a look at the other guides by Holygamerz on Sekiro: Shadows Die Twice!
- Where to find Rosary beads
- Better fighting strategies
- How to gain experience fast
- How to earn Sen credits and experience fast
- How to cure Dragon's sickness
- Like swimming underwater
- Where to find all Ninjutsu
- Where to find Pumpkin Seeds
- Where to find all fragments of the Mask of the Dancing Dragon
- Where to find the Carpe del Tesoro
- Where to find materials for Crafting
- How to unlock all endings
- The best skills
- How to defeat all the bosses


![Guides Sophia's Shop Guide [100%] - Persona 5 Strikers](/images/posts/1f5e1c7629d56d6c792ac770a5d6b182-0.jpg)