


Today we want to explain how to change the NAT to get NAT 1 on PS4, and consequently optimize the connection for your online multiplayer sessions
If you're having trouble playing online on PlayStation 4, probably it's because of the NAT of your router. To resolve errors related to NAT, you can manually intervene on the connection settings. To connect multiple devices to the Internet, the router redirects some data, which will subsequently be sent to the correct recipient: this system is called NAT. Occasionally some problems can occur during online gaming sessions due to NAT, but don't worry: today we are here to tell you how to get NAT 1 on PS4.
What is NAT?
Il Network Address Translation (abbreviated NAT), specifically it is the mechanism that allows the translation of network addresses. Speaking of a private home connection, NAT makes it possible to "mask" the data packets traveling on the public networks of our provider. You can find different types of NAT, with different characteristics based on the condition of the ports. In particular we can have:
- NAT 1: open and available to welcome any connection from the outside (such as those needed to play online). This is the best case obtainable.
- NAT 2: the most common situation among players, with the opening limited to some specific ports used by the game we are playing.
- NAT 3: the most frequent to cause problems, being the least open to accepting connections from the outside
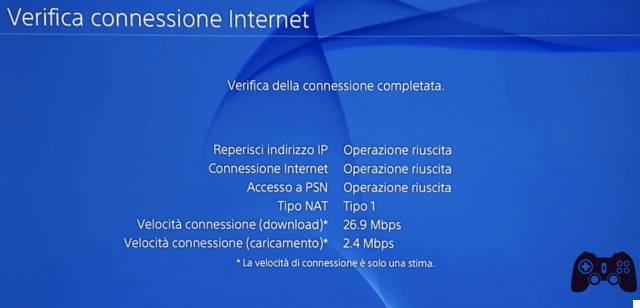
To find out your NAT on PlayStation 4 you need to go to the network settings and click on "Check Internet Connection". Then select your connection, wireless or via Ethernet, and start the check. Next to the item "NAT type" you will find the NAT related to your connection. If your NAT is already type 1 then you shouldn't have any problems, and if you do, it's something else. If, on the other hand, you have a NAT type 2 or 3, we are about to explain to you how to get type 1 NAT on PS4.
Change NAT - How to set NAT 1 on PS4
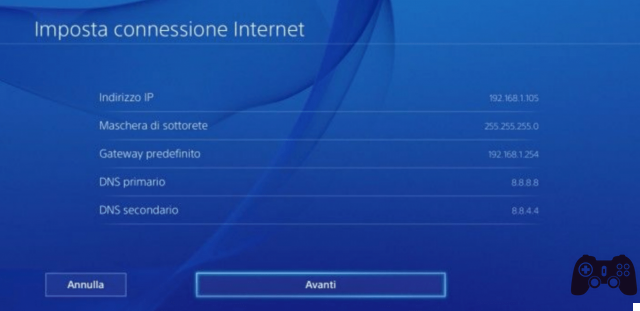
To change the NAT on PlayStation 4 you have to go once again to the network settings, and select the item "Configure internet connection". Choose the type of your connection and start the configuration. Select "Custom" and choose to set a Manual IP address. At this point you will have to enter the address of your router, in gere it is a number similar to this: 192.168.1.1. The pattern will be of type 192.168.1.xx where the two trailing x's are a number of your choice. In the voice "Subnet mask" instead type 255.255.255.0 .
In the voices "Default gateway" e "Primary DNS" enter the router address as above, while the voice "Secondary DNS" it can remain empty. Go on to the next screen, and set the MTU value to “Automatic” and not to use proxy server. You have now assigned a static IP to your PlayStation.
Open game ports - How to set up NAT 1 on PS4
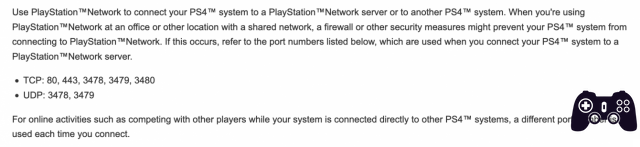
The next step is to open the doors of the games, to play online to the fullest. Sony has compiled a list of standard port numbers, which should be fine in general. The numbers are:
- 80 TCP, 443 TCP, 3478 TCP, 3479 TCP, 3480 TCP
- 3478 UDP, 3479 UDP
At this point you need to configure the ports in the router. To do this, you will need to open the Internet browser and connect to the router address (which usually is 192.168.1.1 or 192.168.0.1) and access the settings. At this point, you'll have to go through the router settings a bit, since each brand has a different menu. Once you've found the ports section, add a new PS4 configuration and enter the port numbers you entered for the console.
Be careful to enter the same value in both fields dedicated to ports (TCP and UDP), then save the settings and close the screen. At this point, to verify the outcome of this operation, test the console connection again. NAT should be improved.
Get NAT 1 - How to set up NAT 1 on PS4
Getting NAT 1 on your PS4 isn't easy, as it is it depends on the provider of your connection. Among the service providers that support this type of connection we find TIM, Fastweb and Vodafone. Furthermore, this connection method requires the PlayStation 4 to be connected to the router via cable, or via Wi-Fi of the AC type, but supported only by PS4 Slim e Pro.
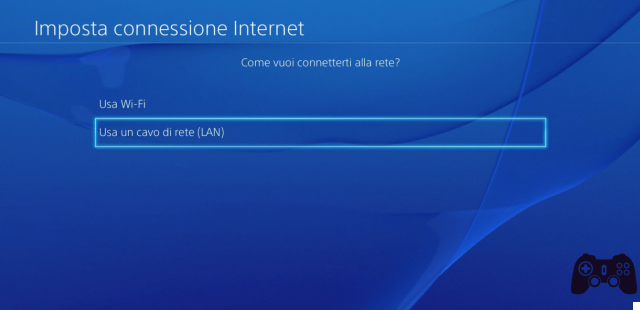
In case you meet all the requirements for having a NAT 1, to set it up you need to connect the PS4 to the router via Ethernet cable and set up the connection manually once again. To proceed, retrace the previous steps you followed to change the console's NAT. Here you choose the item "Use a network (LAN) cable", and then select "Custom". Here, in the entry "PPPoE" enter your provider's credentials to log in.
For example, if your operator is TIM, you will need to enter timadsl both as a user ID and as a password. If you are not aware of your credentials, we advise you to search for them online. Once you have followed the steps listed, press the Next button, leave all other settings on "Automatic" and test the connection again. You should now have a type 1 NAT.
And have a good session!
Well friends, this was our guide on how to get NAT 1 on PS4. We hope we have solved your connection problems and wish you a good session online gaming with your friends. As always, we greet you and invite you to stay connected on Holygamerz for further guides, news, updates and much more from the world of video games. Hi and have fun!


![Guides Sophia's Shop Guide [100%] - Persona 5 Strikers](/images/posts/1f5e1c7629d56d6c792ac770a5d6b182-0.jpg)