


Please note:
The solution is based on the American version of the game, so there may be differences with the Spanish one.
Prologue
As soon as you start the game, you will find yourself aboard a prisoner transport, a corrupt cop is involved in all this, this opening scene is a flash forward.
We will find ourselves in the role of the protagonist, a detective from Miami Vice. You are with your partner in front of a house that you are about to break into. You and your partner exchanged a few lines and a little conversation.
In case you're curious, it's the same agent Crocket and Tubbs worked for on the Miami Vice TV show, plus there will be plenty of other references to this same show throughout the game.
After you break down the door and are ordered to keep the first two suspects in custody, handcuff them while your partner has your back. Once the second suspect is handcuffed, a woman will rush out of the bathroom and start shooting. You will find yourself in the middle of a firefight, as the other two will also draw their weapons and start firing.
There is some evidence on the floor that you will need to take, so another man will come and as soon as he notices you he will start to flee. You will find yourself projected into a full action movie-style chase, on a car and in the middle of city traffic, your partner will end up shooting the tires of the fugitive's car causing him to collide. Take custody of the criminal and the point of view will become that of the news broadcasting the news.
You will find yourself inside the police department as your commander gives you new instructions. You will then get the impression that this game plays out exactly like a crime TV show and that's exactly what it is, complete with division into episodes.
Back to school
During the wait between the prologue and this new chapter, you will be given some advice on the criteria for achieving the best success during your cases, such as identifying and arresting suspects and finding the evidence that will allow you to compile the various case files; in this way you will unlock new special weapons.
A very important thing to keep in mind (the same tips will make you understand), is that arresting a person, rather than shooting them, will allow you to get more experience points and advancements.
During the briefing with Captain Dawes, you will find that you have been assigned a new female partner, the girl will not be very happy working with you. Once you have obtained the first basic orders, you will find yourself outside in a car and in the passenger seat with your new partner; you'll be on the lookout for a suspect named Lawrence Kent.
During the journey, pay particular attention to the dialogue with your partner, you will receive various tips and important details about the case and how you should proceed.
Once you arrive at the entrance of the "Projects", you will be forced to leave the car and proceed on foot. You are looking for a petty thief named Brix. Follow your partner to your destination and enjoy the city landscape that surrounds you.
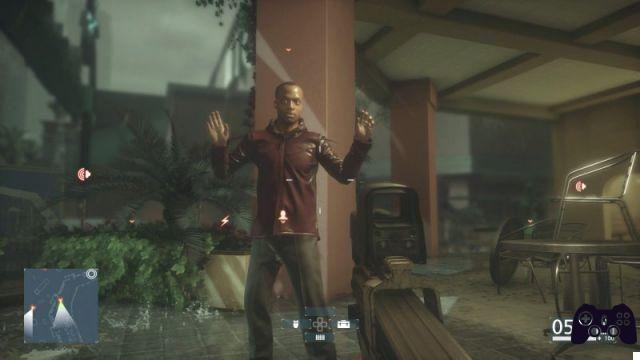
Follow the instructions on how to use the card, you will have to press the right button to block the suspect; the game advice will inform you that if you are unable to keep the suspect at gunpoint with your weapon, you will raise its alert indicator causing the suspect to behave stupid and reckless.
Once you reach Brix, you will find out where Tap is and, once you turn the corner, you will find its entire cove; This is the moment where the Suspect Alert Indicator will be explained to you. Basically you will have to keep an eye on this indicator and watch the visual cones on the game map to try to go unnoticed.
Along the way behind the houses and gardens, the game will teach you how to jump, crouch and sprint. Once you reach the gate, crouch behind the wall and listen to the conversation going on behind it, then cross the alley to the next point where the game will teach you how to distract suspects.
Upon reaching your destination, the game itself will instruct you on exactly when to distract one suspect and knock out the other. Try to get the attention of one of the men by detonating a cartridge case, then quietly approach the other target and knock him down by taking him from behind with a blow to the back of the head.
With Tap closed on the corner, you will have the opportunity to question him and find out where Tyson is. After putting some pressure on the man, ordering him to be arrested for possession of illegal material, Tap will agree to help you, this means that he will connect to your mobile device and you can track his movements.
With your contact connected to your system, the game will give you instructions on how to use the scanner, a combination of listening and detection devices (it also has a powerful zoom).
The scanner will also be connected to every federal database, in this way you can frame the face of a suspect and have all the information of the case.
As you watch a group of shady individuals appear when Tap makes contact, a gunshot will have gone off nearby; try to scan as many criminals as you can, so you can spot them, then go down the stairs and enter the alley.
You will find yourself in front of several suspects and the game will give you instructions on how to stop several people at a time, press the button and extract your card, in this way you will block up to three targets, then you will have to move the aim on each of them in a way to prevent the warning indicator of suspects from rising and to ensure that they do not offer resistance.
Upon exiting you will encounter another suspect who you will need to investigate with your systems to find out if an arrest warrant has been issued. When you meet a suspect on whom a warrant has been issued, you can arrest him to gain much more experience points.
Once the two men-laden cars arrive, be sure to scan each of them and unlock the game achievement. As you reach the school by eliminating all the enemies in the path, you can decide to use the taser to not eliminate the opponents. Once the facility has been cleared of any hostile presence, you can collect the tactical chest. The more suspects alive, the greater the reward inside the tactical chest.
Once you get the tactical case and, if so, get a new weapon, take out your scanner and start looking for evidence. The files on the case will be unlocked with each test analyzed, your instrument will vibrate when one of them is close and you will be able to analyze everything in front of you. On the table you will find a bump and when you press the button to check it, you will get all the details of the case.
Inside the room you will also find a box of Hot Shots, a new drug in the form of liquid cocaine and above it the ledger and some money. Press the key to listen to the commentary of the audio clip.
On the sink you will find some photos to scan and which will turn out to be surveillance files on your former partner, Detective Carl Stoddard. In the next room you will find the drug box and in the next room a computer running with an active video chat, through which you will see Tyson; the man is definitely not happy.
Finding all these items, you will be rewarded in different ways, first you will get the game objective, you will unlock new weapons. Then as you advance and take out other opponents, you can collect the Glock 17 pistol and the 870P Magnum shotgun.
After a short car ride to your target's location, you can enter the door you passed during the prologue.
As you are about to kick the door, Tyson will open it for you allowing you to enter and have a chat, another thug will burst into the room and shoot at your partner forcing you to stand still where the girl fell and you are standing. trying not to let her die. You will then have to hit all the enemies that will burst through the window and door while continuing to keep the pressure on your partner's wound. Keep the bad guys away long enough for reinforcements to arrive, your partner will get the right medical attention right away.
Once you have examined the mission summary, you will discover that your partner has already returned to work despite the negative opinion of the doctor, so the Captain will explain everything that has happened, providing you with advice and information.
Checking Out
Before starting, it is right that you know that the purpose of this mission is to capture the greatest number of enemies ALIVE! You will receive far more credits for a clean arrest than a kill, don't forget, experience will be key.
The suspects you will have to arrest during this mission are: Rosado, Javier, Volker and Gary. You will reach the meeting place and find that Captain Dawes' absence is frowned upon. Things will take a turn for the worse when the informant walks away and several bad thugs start firing.
All you have to do with the help of your partner is to take out as many opponents as possible and arrest them alive as possible, start with the two you meet on the upper level of the basement parking lot. Once you have eliminated the two enemies, approach the next opponents silently and knock them out. When the situation is calm, start chasing the informant by running the entire hotel.
Once you reach the laundry room, you will have to take out a group of six opponents, done this, use the scanner to find a box of Hot Shots. Hanging from a shelf you will find a shirt with a document attached to it, this is another piece of evidence that you will need to scan. In the room above the stairs you will find a tactical chest and on the table a list of drug buyers, this is also a document that must be scanned.
As you advance into the Lobby, take out the pair of enemies, then take the corridor to the right. You will find a door to an office, enter and scan the answering machine on the table in the back. The next door will lead you to the check-in desk, where you can find a tactical chest in case you want to switch weapons and you can still use the opportunity to reload your taser. Near the tactical box you can find a Xerox machine with a scan object on it.
Continue inside the lobby and up the stairs to the director's office on the second floor above the area, you will find your partner beating up the informant. Once you've knocked out the suspect Javier, search his corpse to find a vial of Hot Shots. Once your partner has calmed down, another group of enemies who are looking for the informant will appear inside the lobby on the lower level, your aim will be to take them out and take the informant out of the hotel.
Once every single threat is eliminated, take the informant inside the pickup truck that is outside and cross the causeway, taking out every pursuer until you reach the captain who will not be happy anyway.
Alligator bait
You will start this mission inside the Captain's office while general information is given to you, then the Captain himself will explain your real situation. The suspects you will have to arrest are: Minguez, Luis, Bell, Thomas, Brown and Nathan.
You will find yourself in the Everglades aboard a hovercraft in the middle of nowhere, you and your partner will talk about what is happening. Navigate with the water vehicle towards the two indicators to mark them with a dart. As for the third indicator, you will need to dock and walk. Once the marker is marked, you will be attacked by an alligator. Follow the instructions on the screen and wait for your partner to save you. Head to the platform to have a grapple delivered to you and use it to climb to the top and down the lower ramp to attack with the new tool. On one of the first wooden platforms you will not find evidence, but instead a sniper rifle, to find it you will have to grapple with the highest tower, then slide on the lower one halfway.
Once at the top, Kai will give you the tool with which to shoot the grappling hooks and which you will immediately use to break through the barrier further ahead. Use the scanner to locate some enemies and an exploded bale that represents evidence to be scanned. Beyond the piers where the enemies have parked their hovercraft, you'll find a barrel to scan as evidence. Use the crowbar to open the door of the shed inside which you will find a tactical box and a radio whose frequency will reveal the presence of other targets.
Approaching the boat, you will receive advice on how to use the scanner from a distance, then jump on the boat to head to the first indicator that turns out to be a logging field and a sawmill, your partner will ask you to use the scanner for any alarms. On the left there will be a group of drug traffickers and a test represented by a propeller, advance and scan everything from a distance, you can also listen to the words of the criminals.

What I can suggest in this situation is to return to the boat and use the tactical box to equip the R700 LTR sniper rifle and add the 8X sight and silencer, then you can fire the perimeter alarms in complete safety. You can then reach the camp and arrest everyone with a little patience and tactics.
Once you have cleared all the targets around the main shed, use your scanner to examine the water sampling equipment. With all threats eliminated, scan more evidence and the document attached with the snap knife. Inside the shed you will find a very old cell phone, so scan the yellow envelope on the table next to the tactical box.
Go back to the boat and head to the next marker which will be at a dock near the wooden platform. Use the grapple to reach the top and scan the large pile of cocaine. On your way to the next marker, you'll notice a flag icon that will lead you to a dock where you can scan a barrel of chemical material. You can then navigate to the next marker, climb the tower and use the rope to climb the one in the middle of the water on which you will find a map of the region.
Go back to the boat and pass the spot where you found the map to notice a nearby flag marker. Reach the dock and climb the tower using the grappling hook and reach the furthest tower with the rope and get a nice WWII weapon. Make your way to the mill and scan the area to hear Nathan Brown's conversation, then check out any other nearby enemies as well. Once Nathan is eliminated, check his corpse for another piece of evidence in the form of a newspaper clipping. On the dock you will find a dead alligator that you will need to scan as evidence. Inside the nearby shed you will find some boots with suspicious traces that you will need to scan. Eliminate all the opponents and follow the new marker that will take you inside the structure with the radio. You will find a tactical chest through which to reload your weapons.
Jump back into your boat and move away from the dock to find yourself in the next section of the area. Take out the guard, scan his teammates and Remy so you can arrest him and get the bonus. Once you have taken out the whole gang, Remy will flee and you will have to chase him to the boat shed, where you will confront him and he will tell you something really strange before continuing his escape.
Reached the new position, you will have to make your way by eliminating each opponent up to the upper floor, you will discover that Stoddard and Kai are corrupt cops.
Case closed
The suspects for this mission are: Evans, Miller, Diaz and Gonzalez. As usual, you'll want to arrest these targets rather than kill them. During the initial briefing you will discover that Kai is not corrupt after all. During the central part of the episode when you are confronted with Stoddard, you will be able to obtain the M16A3 from the corpse of one of the killed enemies.
Once you get to the office, Kai will stay outside and you can go inside, open your scanner to find three pieces of evidence. The first of these is a gym bag full of cash in the corner of the office. You will find another trace on the paint barrels along the wall. Upstairs and inside an office you will find a strange doll. On the table in the office reachable by climbing the stairs, you will find an Elmore Plaza card.
Scan the painting on the office wall to find that someone has been tinkering around behind it recently. Close the scanner and move the painting to find a safe. Open your scanner again and check the numeric keypad to see that the buttons used are: 1, 4, 5 and 8. Try these numbers to find the exact combination. Inside the safe you will find a micro recorder. On the way back you will find a trash can with a rundown phone inside, go downstairs and talk to Kai.
Once you have reached the target location, Kai will stand by and you can enter. Your partner will have to get away to chase a suspicious medium and you will be left alone. Use the scanner to locate all the guards present and the suspect, Philip Evans. You will find a tactical chest on the roof that you can use to equip the sniper rifle with the silencer and eliminate all alarms present. Use the "rope thrower" to reach the opposite side and take out the first of the guards, then use the crowbar to enter the warehouse where you can hear Stodddard. Scan the Tamu Tamu poster and use the tactical chest to reload your weapons.
From the walkway outside the office, scan the enemies and mark them, then check the physical evidence below, the Tamu Tamu DVD. You can then overhear the talk of the three criminals below. Once you have eliminated all the guards on the ground floor of the warehouse, head to the office by going up a short flight of stairs and scan the document. Inside this same office you will find a table with other documents to scan and unlock an objective. Go downstairs and use the crowbar to open the door, pull out your scanner again to find another piece of evidence. Kill the guard and examine the drug chest with the tool. Make your way to the security room and use the camera controls to see Stoddard along with some thugs. Enter the back room to find Stoddard on top of a corpse, then the structure will catch fire and you will have to deal with several enemies.
Once you reach the mall, activate your scanner to locate all the enemies, including Leonard Miller. Be sure to clear all alarms and use the crowbar to enter. Once inside, use the security cameras to locate all the enemies, you will find a tactical chest that will allow you to retrieve the ammo. With the help of Stoddard you will save Kai and together with her you can eliminate the remaining enemies and reach the exit. Unfortunately, you will discover that you are the only uncorrupted cop in town.
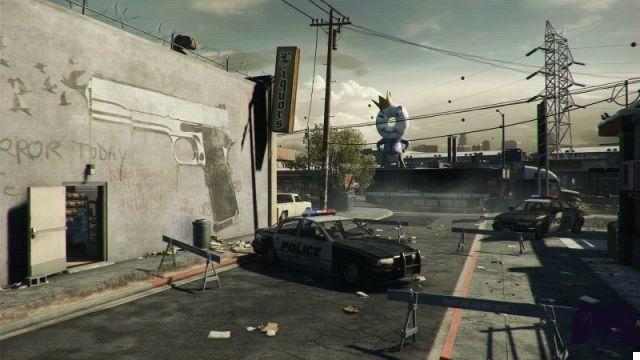
The gauntlet
You will start this episode three years later and inside the detention vehicle, Tyson will make an appearance and the vehicle will make a big leap in the air. Once you regain consciousness and are free, a thug will inform you that Tyson is waiting for you at the water tower.
The objectives of this mission are: to steal a taser from a police car, not be detected by anyone and blow up the Meth laboratory. The problem is that the path along this mission will be quite straightforward and you will have to lay down a cop to get the taser as quickly as possible and use it carefully as you advance.
Once you reach the structure you will have to go through the window and enter the Meth laboratory, reach the basement and let the gas out to light a flame and escape before everything explodes. Go through the hole in the wall and up the stairs, reach the porch of the house ahead and hide from the helicopter. Attract the attention of the policeman who controls the area, throwing a stone and stun him with the taser. Pass the narrow tunnel and once on the other side, carefully reach the tower. Once there, Tyson will inform you about the situation and will give you a flashlight giving you precise instructions.
You will have to reach the marker on the map without being seen by the cops and the helicopter, this means that you will have to move from one cover to another. You will reach Tyson and get into a car driven by Kai, then you will be updated on everything that has happened in the last three years.
Out of market
The suspects of this episode are: Kwok, Mun and Oh. You will be sent to hack a computer; once you arrive on the spot, take out your scanner to find a tactical box and, on a table, the order of Bianchi which will represent the first proof of the case. Inside the office, you will also find a second document, the letter from Kang's wife. Reach the computer and insert the USB device to download the data, you will also activate an alarm and several enemies will break into the room. Escape to the car and escape inside the canal to pass through the viaduct. You will have a chat with Kai over the radio and you will receive information on the next objective.
Once you get there, you will find a tactical gear at the bottom of the car, then open your scanner to find that there are four evidence in the area. The most efficient way to solve this is to take the grappling hook and head towards the building and go up the stairs. Use the scanner to locate the targets along the way, then exit the building through the main door and use the grappling hook to reach the top of the building in the middle of the streets. Use a silenced pistol to clear the alarm. If you arrest the suspect in the back, be sure to search him for Boomer's photo, then take out the other opponents and enter the garage to scan the luggage. Use the crane controls to lower the car and free Boomer who will give you his key.
Reach the second warehouse and go up the stairs on the right side to enter the office and take out the enemies inside.

Use the scanner to tag the enemies downstairs, including the suspect Kwok, then also check the physical evidence below for "K-Pop Album". On a work table you will find another piece of evidence, the remote detonator. Go out the back door to find Boomer's car, take out the computer and blow up the head of the enemy who will attack you before the warehouse explodes. You'll have to deal with half a dozen enemies; reach the first warehouse and run to the car to find that Boomer is sitting in the back.
Go straight then left, avoid the train and drop into the canal, turn right and continue. Once in the canal you will have to avoid getting hit until you change places with Tyson. At this point you will have to shoot the enemies in the other cars until you reach the subway tunnel. Once in the new warehouse, scan the area to mark all enemies and locate the three pieces of evidence. Take out all the enemies and scan the documents on the table in the office. Kill all the enemies in the warehouse and scan the evidence in one of the cars and in the back. Take out Kang and his guards to find a room full of cocaine.
Glass houses
The mission will start near a large house. Before continuing towards the objective, interact with the nearby tactical box, make sure you have silenced weapons and the grappling hook with you. Advance to the building on the right hand side and break into the garage. The first evidence of the area will be found in the white pickup truck at the back of the room. Follow the corridor to the main area, then turn left to enter a small office where you can scan the second proof on the shipping labels. Exit the office and go upstairs to the main objective, once you reach the conference room, place the bug under the globe of the table to start a cutscene.
Go downstairs and arrest the man at the foot of the stairs, use your scanner to mark the enemies in the lower area, one of them has an arrest warrant, so it is advisable to be quiet in knocking out his teammates. . Once Cameron Briller is arrested, search him for the combination of the safe. Two men will burst through the front door, settle out of their line of sight and reach the door to arrest them, then take out the remaining enemies in the house.
Turn right and go around the corner after the kitchen to enter the gym, inside you will find two enemies, kill them or arrest them. Interact with the panel in front of which the first enemy was to find a keypad on which to enter the combination found, searching Cameron Briller. Inside the secret room you will find another proof, turn left and scan the wall with the photos. Reach the terraces and walk up the stairs to the greenhouse, take out the only enemy present and scan the barrel of tear gas. Exit the facility and head to the tennis court to find another suspect, bypass the men silently and pull out your card to arrest them. Make your way to the shooting range and take out the guards, then scan the silencer on the floor and the ammo on the small shelf. Go to the warehouse and scan the SWAT jacket on the shelf to the right, check the game map and head to the main objective.
Go upstairs and don't interact with the briefcase, then open the safe to the left of the bed and scan the evidence inside. You will start a small cutscene, after which you will have to defend yourself from several enemies.
Sovereign land
The mission will start aboard a car, once you reach the destination you will start a short cut scene, after which you will have to follow a linear path and turn left to reach a man who is working on some electrical material; hit the man to get the keys to the handcuffs and a gun. Follow the straight, straight path and take out the lone guard, then advance to the room, where you will find four men ready to be arrested. Collect your scanner from the table, then exit the complex.
Once you arrive at the camper parking lot, you will need to find your weapons inside the two-story vehicle at the back of the parking lot. Use the scanner to locate all the enemies along with the suspect named Jim Preston. Lure the man into the camper where you found your equipment and arrest him without too much trouble. Disable the alarms and move, making sure you stay out of sight of the enemies. Once you've arrested the man on whom an arrest warrant hangs, check him for the agent's ID. Arrest or eliminate all the men in the parking lot, then look inside the area for more evidence. Follow Boomer on the embankment to the right and inside the furthest camper you will find blueprints to scan. Once the station guard is down, enter the RV in front of him to scan the lab for Hot Shots. In front of the double-decker camper where you found your equipment, you will find a small building inside which you can scan the Dossier on Boomer. Go up to the second floor of the camper you are in and scan the cell phone and torture tools on the right. Get to the car and make your way to the main objective indicator.
After the cutscene is over, you will find yourself in the middle of a big firefight, do your best to survive, hiding behind the metal freezer. Go to the field to the right of the gas station and scan the license plate on the broken car. Cross the street and reach a burned-out house to scan the agent's tomb. Done all, get in the car and drive to the next target.
Enter the hangar and scan the explosive on the far wall to complete the investigation into Boomer. Exit the hangar and go up the stairs to start a short cutscene after which you will find yourself at the controls of a piece of artillery from a fallen plane. Kill each enemy and get off the artillery to run straight to a structure indicated by the target on the map. When the wall blows up, exit to the left and jump into the tank. Stay focused on Alpert's chariot, then make your way to Boomer's plane.
Independence day
The mission will start during an ambush, quickly shoot the two men who enter the room and when you get the chance hit Stoddard. Follow your partner up to the white pickup truck to start a cutscene, after which you have to take out your scanner and locate all the enemies in the area and a man named Derek Kelly on whom an arrest warrant hangs.
Approach the structure through the back, take out the two guards in the alley and scan the chest of books. Enter the back door and turn right to reach the security room, take out the guard and use the camera to spot all the enemies inside the lobby. Scan the staff chart inside the same security room, then take out the other guards and join Derek Kelly to arrest him. Interact with the keypad in front of the table to unlock the elevator and reach the twentieth floor. As soon as you reach the office area, use the scanner to locate all the enemies. Turn left and stop the walking guard, take the same direction and enter the office on the right, scan the letter and reach the room in the left corner of the back of the building, enter the conference room to scan the drawing.
Join the men watching the fireworks, take out the guards from behind and lure the man on whom the warrant hangs to arrest him without too much trouble. Search the man to find the letter.
Disable the alarm and deal with the remaining enemies in the area. Head to the target indicated on the map and open the door to start a cutscene,
Go up the large stairs until you reach an office, turn left and go through the double doors. Once you have climbed a few more stairs and into the upper office, scan the emails from Dawes' computer to complete the investigation. Before entering the elevator, scan the photo of Dawes and his wife on the shelf to the right. Take the elevator and once you have regained the controls of the protagonist swim up through the shaft of the elevator itself.
You will find yourself inside the Dawe penthouse, go to the office and scan the site on your computer. At the top of the stairs on the office, enter the bedroom to also scan the photo of the dying wife. Go back downstairs and use the touch screen to open the terrace doors. When Tyson bursts inside, you'll need to look for the safe accessible at the golden bust of Dawes. Resist the enemy attack until the safe is hacked check the drawer inside and after a short cutscene run to the tightrope.
Once the rope has been cut from the helicopter blades, start shooting the man on the balcony to get the trophy. Once on the road, join the boat to end the mission.
Heredity
Once on the ground, set up the alarm system and arrest all enemies, including the one on which an arrest warrant hangs. Head to the building and enter the office to scan the fax, then use the tactical chest to stock up on ammo. Go to the location indicated on the map and brand Lyle Feldman to make sure you don't kill him. Once the enemies have been eliminated and the man arrested, disable the alarm and use the scanner to locate the next proof document.
Reach the area where the other suspect is on which a warrant hangs, eliminate the enemies and arrest the man, then go inside the complex. Within a building complex, you will find the surveillance report to be scanned as evidence. Head to the crane area and go up the ramp to the left, get on the bike and reach the estate.
Once in front of the house, enter the lower floor and climb up to the roof to access a small room where you can obtain the Hector Mendoza dossier. Follow the marker on the map to reach the Mephistopheles Captain Dawes who will want to talk to you. Once you have taken care of your former captain, go to the table and read what he was writing, follow the indicated direction to open a vault and find that Dawes has left you a good fortune.
 Battlefield Hardline ps4
- pc
- ps3
- x360
- ps4
- Xone
Exit date: March 19 2015


