


Please note:
The solution is based on the American version of the game, so there may be differences with the Spanish one.
Underground
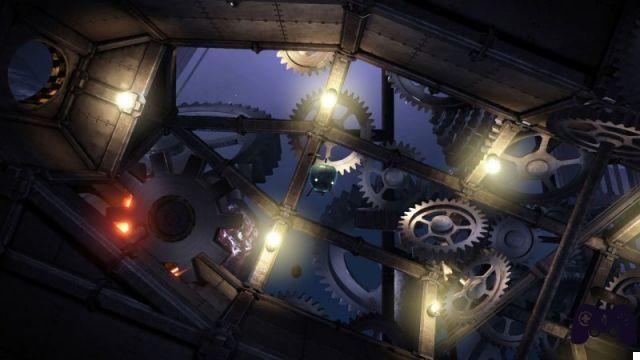
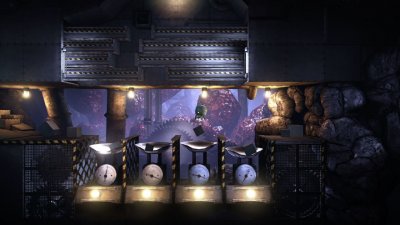
As soon as you start the game, you will see a small introductory cinematic, during which a small robot is dragged underground. Once you have taken the controls of the little protagonist, you will receive some information on the game's advice system, in fact, with the right button you can activate a small icon in the shape of a comic, it acts to give you advice on the current puzzle that you are in front of (you must be really close to the puzzle itself, otherwise you will only see a question mark). The remaining control commands will not be anything complicated and it will take you very little time to master them. Begin your ascent until you meet the first obstacle, use the tractor beam to grab the rocks and throw them away to create a clean path. You can also try to collide with the rocks themselves and use force to make them fall and create a passage. Do not float down, as you will not be able to open the passage you will find. On the other side you will find a closed gate at the top, to open it you will have to move a lever using the tractor beam. Advance floating until you reach a force field, know that beyond this type of field (which you will encounter at other times throughout the game) it will be impossible for you to carry any object. Continuing in your float, you will reach another closed gate, this will only open by pressing the big red button and flying over at the same time, obviously you will have to help yourself with a rock; You'll find several on the left, so use the tractor beam to pick them up and place them on the button itself. Once the gate is open, don't waste any more time and fly past. A little further on you will encounter a dead end to the right and a knob for the sewers, use the tractor beam on the knob and go through the tunnel. Once on the opposite side, float to the left, where you will find yet another closed gate. By pulling the piston, you will release a sphere that will go into the second tunnel that you will have to block. On the left you will find some rocks, take one and place it near the tunnel on the right, now pulling the piston a second time, the sphere will hit the stone and you will be able to grab it. The last step will be to rest the sphere on the button to open the gate which, however, will not pass in the small space. Remove all the stones that prevent the passage of the sphere and pull it inside, this will press the button and the gate will be opened once and for all. Float down until you find yourself in a small room with four colored light bulbs. This puzzle will test your memory and unfortunately it will be random, so it is impossible for me to write a solution. Your task will be to repeat the lighting sequence of the bulbs three times. Once you pull the piston in the center, three bulbs will turn on randomly and you will have to repeat it without errors. In case of failure you will have to follow a new sequence. The second time the bulbs will be four while the third five.
Shortly after the next gate, you will find a shiny sphere, to free it pull the piston; from now on you will have to carry the sphere with you and never forget it. Float to the right to pass over another knob, open it and push the glittering sphere into it; continue to float to the right passing beyond the force field, through which you will not have been able to pass along with your sphere. In the next puzzle that you will find yourself in front of you, you will be forced to press the four buttons in order to release the glittering sphere from the gallery. One of the blocks will already be open, so you will have to find the button that operates on it (it will be the one not pressed), usually the second or third from the left. A little further back on the right, you will find three bricks, use two of these and place them on the appropriate buttons, then arrange the bar on the bricks horizontally to press more buttons; the sparkling sphere will be released and you can advance with it. Once you have opened the next gate, advance until you reach the last puzzle of this level. Your task will be to arrange three parts together, so that they can fit inside a hole in the background. Assuming to number the three moving parts as follows: 1 (the one closest to the screen), 2 (the one in the center), 3 (the one on the back) you will have to work on the three pistons in this way:
Piston on the left: 1- once, 2- twice, 3- four times.
Piston in the center: 1- once, 2- twice.
Piston on the right: 1- once
To arrange all the parts in the dionean configuration, pull the piston in the center twice. When the passage is open, move the glittering sphere into the open gallery and when it is sucked into it, a new manhole will open, allowing you to reach the next level.
Pacemaker - Part 1 - First gallery
Before advancing into the new level, don't forget the sparkling sphere, it will illuminate a small path that will lead to the Pacemaker, insert the sphere into the clamp to unlock the first gate. The first puzzle of the level consists in arranging the right weights on four different scales, on your left there will be four piles of blocks divided by size and we will number them from 1 to 4 starting from the left. This puzzle will also be generated randomly in each game, so there will be several possible solutions. You will need to think carefully and understand what weight needs to be placed on a specific scale. However, I can give you two possible solutions, numbering the scales starting from the left going to the right:
Solution 1
First scale: empty.
Second scale: a block from the heap 3.
Third scale: one block from heap 2.
Fourth scale: one block from pile 1 and one block from pile 3.
Solution 2
First scale: a block from the heap 3.
Second scale: one block from pile 2 and one block from pile 4.
Third scale: one block from pile 1 and one block from pile 4.
Fourth scale: one block from pile 1, one block from pile 2, one block from pile 3.
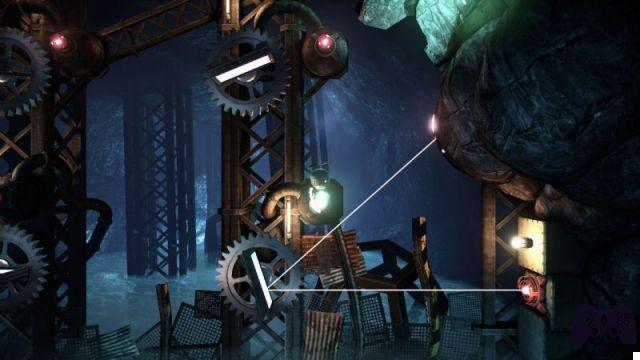
Once the weights have been properly adjusted, you can go through the new passage just created. You will soon encounter a closed gate whose lever is damaged, near it you will find a rock, use the tractor beam to pick it up and move it to the beginning, throwing it under the rotating gear. The result will be that the gear will explode and be thrown at the gate which will collapse on impact and you will be able to advance. If any piece of the destroyed gate gets in your way, just remove it without too many compliments. Fly through the small passage to find yourself in front of the next gate. To open the passage, you will have to use the tractor beam on the red sphere, keep doing this until you feel that the gate will lock itself, you can then stop using the beam as the gate will remain open. The next puzzle you will face will force you to arrange mirrors so that the laser beam hits the dodecahedron under the gate. The puzzle will be quite simple and the only mirrors you will have to move will be, starting from the top, the second and third. Once the dodecahedron is charged, the gate will open and you can go through. You will find yourself in front of two other dodecahedra and the sparkling sphere that you will have to carry with you, unfortunately you will not be able to solve this puzzle yet and you will be forced to advance.
Pacemaker - Part 1 - Second gallery
A new gallery will have opened, float inside and go inside the pipe to reach a large room. Unfortunately, the lever to open the next gate is broken due to a malfunctioning cable. To unblock the passage, you will have to raise the water level allowing the electricity to reach the cable itself; to do this, just throw large stones into the water. Unfortunately you will soon notice that your efforts are not enough and you will have to look for other objects, go up to the small room inside which you will find heavy objects, take them all and throw them into the water. Once the liquid level is at the right height, the gate will open and you will be able to continue, unfortunately you will not be able to take anything with you as you will have to go through a force field. A little further on you will have to deal with a new puzzle with laser beams and a dodecahedron that will have to be loaded. Arrange the bricks along the path of the ray and place the mirrors on them in order to direct the ray to the right, do the same thing with the one near the dodecahedron taking another mirror, the ray will have to reproduce the sides of a rectangle without the top.
The second step of this puzzle will be considerably more difficult; take the remaining mirror and place it on the path of the ray, so that it reaches the desired object. The difficulty is that gravity will continue to drag you down and you will have to go up from time to time. Once the gate is unlocked, it will be time to solve the puzzle you left behind a while ago. You will have to combine two laser beams in order to direct them towards two different dodecahedra. The key role for the solution will be the bricks that will carry the mirror on the left. On the right you will have to position the lower mirror, so that the beam can advance to the left; you will need to arrange one of the mirrors so that it reflects both laser beams. Thanks to the puzzle you just solved, you will get a new sparkling sphere that you can insert inside the next pliers. To continue in the game, you will have to fly inside the tunnel to the level of the mine (pulling the piston to unlock the manhole), later you will return to this level.
The mines
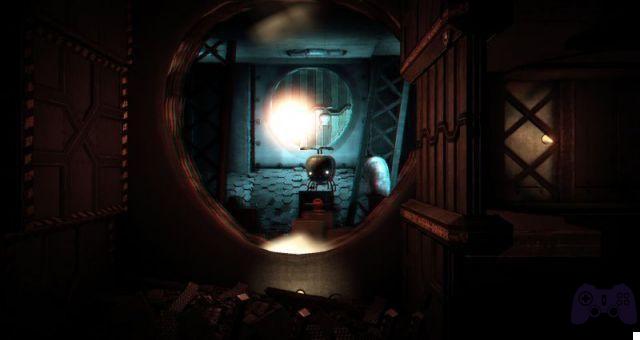
Right from the start of the level, float along the pipe to reach the first closed gate. Use the piston to release the bomb, pick it up with the tractor beam and place it near the small organ near the passage. The bomb will not harm you, but it will blow up the small organ and open a convenient passage for you. Float along the pipe to reach a large open space, on the left you will find a new mechanism that will release another bomb and on your left a kind of furnace. Your task will be to arrange the six pieces of coal inside the furnace. Four pieces of coal can be found in this same portion of the level, while the other two can be obtained later. To extract the pieces you will have to use the bomb again and, once placed inside the furnace, you will raise the temperature which will come in handy in the future. When you are done with the first four pieces of coal, you will have to look for the other two as well, float down and head left to reach a mechanism with two gears. First you will have to stop the two pieces with the result of opening the manhole leading to the pipe; to do this, pick up the metal bracket on the ground and place it between the two gears themselves. The manhole will be unlocked and you can open it. Adjust the next lever so that the first block moves to the top, pick up the bracket again and float inside the tube to set it in the path of the block. Go back to the surface and move the lever, the first block should leave the bottom tube unlocked and the second block will open a passage. Cross the energy field and collect the bracket which will be useful in a short time, since you will have to place it on the button that will unlock a new passage; this button must remain pressed, otherwise the other hatches will close. The next puzzle will require some skill on your part, use the bomb that you can get by pressing the piston to damage all five organs and open the hatches. The problem will be that each trap door has a different rate of descent and you will have to do everything in the right order, start with the lower left organs, then the lower right one and finally the two at the top. Once you have floated past the hatches, press the button on the opposite side to lock them. Go down, where you will find another trap door and the lever on the opposite side of the obstacle. Do not try to push the stone from the opposite side, instead, take it with you and return to the button that is where you left the bracket, replace it with this and take it from the obstacle, place it in the small space and move the lever to continue. You will find yourself in front of another gate that can be opened by simply pressing the piston, here you will find the two missing pieces of coal, use a bomb to extract them, then insert them into the furnace. Reach the portion of the level, where a new puzzle has just been activated, float to the bottom where you will notice a large metal furnace and next to it a vase. The furnace will have two symbols above it, fire and water; unfortunately the next portion of this level is blocked (you can't swim) by the water and you will have to lower the level.
Once the water level is lowered, advance to the door which you can unlock using the plunger. Advance a little to be scanned by a camera, wait for the door to open, then advance. You will reach a monitoring center, use the piston. Move the lever to open another gate, then push the sphere to the open tube on the right, in a few moments you will get a new sparkling sphere, take it and place it in the clamp. A new gate leading upwards will open before you. It is time to upgrade your little robot with a swimming suit, you will find a crate floating in the water, drag it towards you using the tractor beam, place it in the big cauldron and pull the piston. You will be wearing the suit and from now on you will be able to swim underwater. Swim to the next puzzle divided into two phases, your task will be to move the glittering sphere to the opposite side by activating and deactivating the large magnets. The first part of the puzzle will be remarkably simple and you shouldn't have any major problems, just remember that when you deactivate the magnets, gravity will work again. If the sphere touches the magnets, you will have to start over. The second step of the puzzle will be much more difficult. First release the sphere so it doesn't start falling. Before it reaches the bottom, activate the magnets for a very short time. This task will be really tough and will depend on your skill, plus it's hard to tell when it's the right time to activate the magnets, you'll have to try a few times. Once the glittering sphere reaches the end, head left to pick it up and push it into the gallery above. Then go down to the bottom and use the piston to unlock the gate and return to the beginning of the level. The sphere will already be in place when you arrive, use the piston to advance and open another gallery that will take you to the Pacemaker level.
Pacemaker - Part 2 - Third gallery
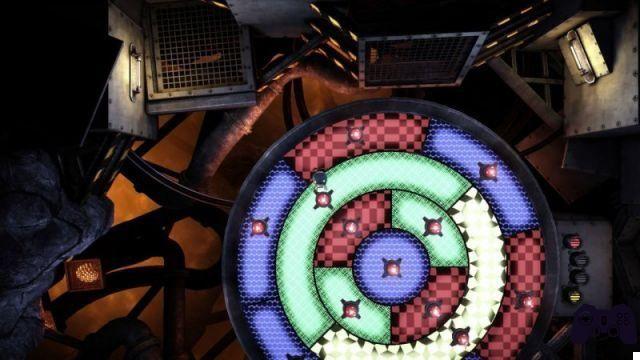
Once you have finished the journey from the Mines, take the sparkling sphere and place it in the third clamp in the center of the portion of the level you are inside. The time has come to find the last sphere. Now that you have the diving suit you will be able to access the only part that was inaccessible before. Head to the tunnel that leads to the place where you threw the items to raise the water level. Dive in and reach the bottom, you will find the objects dropped earlier, it is advisable to bring at least one of the stones with you so that you do not have to go back. Stay on the bottom all the time until you reach a tunnel with a button nearby, the manhole will open when you press this button, place the stone on it and swim inside the tunnel. Advance and go up the tunnel, you will find yourself inside some guts and you will have to reach the next puzzle with the laser beams. The piston will release a bomb and your aim will be to take it to the gate with the nearby organ that you will have to damage with explosives. Watch out for lasers that could touch the bomb causing it to detonate. The next puzzle will be divided into three distinct phases and its completion will depend entirely on your skill. First take a bomb and throw it into one of the three channels, when the explosive starts to fall, quickly cut the beam so that the explosive can reach the next tunnel; you will have to determine the correct height and nothing can be done if you are too low. When the bomb flies towards you, quickly float to the place where the two rays intersect allowing the bomb to reach the organ. Once you get the right detonation, go to the gate which will remain open for a limited time. Before you get the last sphere, you will have to solve one of the most complicated puzzles in the entire game and, as usual, there is no single solution. Your goal will be to arrange the colored parts of the circle so that each part is in contact with a different one. When the gate opens, step forward and use the piston to get the much desired sphere, then float inside the open channel. Place the ball in the fourth and last clamp. In a few seconds, some spheres without shields will appear and you will have to arrange them so that they are within the radius of the generators that power the bulbs. A huge gate will open that will allow you to reach the next level; use the plunger to open the manhole.
La Fabbrica
Begin by floating to the right to reach the first tunnel which you will need to enter. You will then have to face a memory puzzle in which you will have to reproduce an exact combination of sounds, also in this case the combinations will be generated randomly and it is impossible for me to provide you with a correct solution. Face a second sound puzzle with eight different sounds instead of four and open the gate, use the piston to extract the sphere to take with you. Pull the orb through the channel on the left and fly behind it to drop down. You will find three light bulbs in front of you, first turn on the one at the top right, then the one at the bottom left, and finally the one at the bottom right. You will open a gate but, before moving forward, pull the lever to let the energy flow and turn off the bulbs. The only thing you can do now is to turn on all four light bulbs below and open another gate. The next puzzle will be remarkably simple, and here, too, you'll need to have a good memory. First float to the gate on the right, the keeper will close it before you can enter. When it flies away, you can pull the piston, by doing this, all the metal crates will disappear and there will be some streaks on the screens. Your task will be to arrange the numbered crates under these screens which will initially have the same number of the strips present on the crates, done this pull the piston and open the gate. Float right to reach a broken lever, enter the manhole that opens below. You will find yourself in front of some pistons that move and you will have to float in addition to these which however will not crush you. The next puzzle will still require a good deal of skill, you will see some moving platforms, use the three spheres to reach the opposite side. Unfortunately there will be some powerful fans above the platform itself and you will not be able to advance and you will have to fix the platforms; the important thing is to start moving to the right shortly after the first platform has started to descend. Once past the vents, go right to reach the elevator which will carry you upwards.
At your destination, float inside the channel on the right. You will reach a large cauldron, you will also notice some strange objects that fall inside and generate light. Unfortunately the bottom lever is broken and you will have to find another way to advance, move the red object and press the button. The passage will be unlocked, float inside it and pull the piston to move the two above you. Return to the main hall and press the red button again to unlock the passage through the channel at the top and between the two pistons. In the next room use the piston to open the manhole, float inside and advance. You will find yourself inside a room with a large wheel in the center, there will be some luminous spheres around. Go to the opposite side to the lever at the top; unfortunately the moment you try to use it you will trigger an alarm. This will open an emergency exit at the bottom that you will have to go through to reach the gallery that leads to the next room. Once inside the new area, you will find three large holds, pull them with the tractor beam and when everything starts to collapse, the keeper will appear and will rescue you. You will fall into the water and, when you regain control of the little robot, quickly float up and wait for the manhole to open to enter the tunnel. For a short time you will see the outside world which will prove that you are very close to the exit. You will reach a place with a huge quadruple gate, float down and go left passing the large cauldron. In a small room you will find a battery, take it and go right. You will reach the room, where the breakdown occurred, but this time on the opposite side of the gate. Replace the old battery with the new one, starting to remove the metal plates that block access to the battery compartment. By placing the green battery, you will open the gate. Now you will have to carry out the last step of the game that will lead to the end and depending on which one you choose, you can influence the ending.
 Unmechanical: Extended ps4
- ps3
- ps4
- Xone
- pc
Exit date: February 11 2015


