


Please note:
The guide is based on the US PC version of the game. There may be differences from the Spanish version and / or for other platforms.
Cooperation between the characters
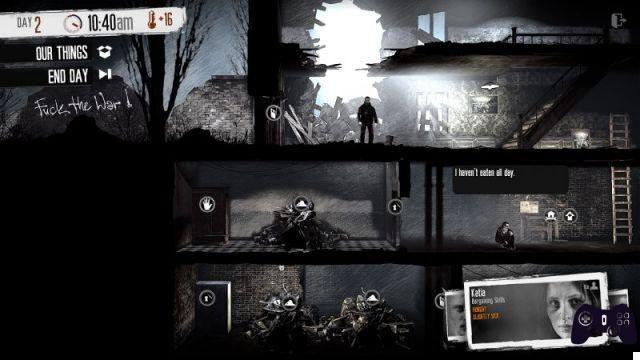
You will find yourself having to act in a conflict zone, taking control of a group of citizens trying to liberate and keep the city in order - as well as to survive. You will then find yourself in a multi-storey house, taking control of three characters. You will control your character using only the mouse - the keyboard will not be necessary. After a short tutorial, the clock inside the interface will show you the starting time and you will have to proceed along the first steps. Your goal will be to try to get home before 8pm. You will have to learn to control all your characters at the same time. Although you may have problems in the early stages, you will certainly be able to quickly learn how to give orders to different characters at the same time.
First, send a group of subjects to all floors of the play area. So tell them to start acting by clicking on specific symbols - they will be circles that will float over specific elements. Before the first night arrives, you will need to be able to locate all the objects scattered around and use them to the fullest. Although the game starts with three specific characters, the size of your party may change later, due to (or thanks to) the presence of bandits, disease, or starvation. Below, we provide you with a list of characters linked to their specific abilities. Each individual skill can have a significant impact on specific actions and situations.
The characters
Anton
He is characterized by abstinence - he does not drink alcohol - and by being an excellent mathematician - he is able to mix ingredients very quickly, creating herbs and drugs.
Arica
She is characterized by the ability to "Proceed slowly" - her enemies cannot hear the character's arrival - and "smoker" - if cigarettes are included in the equipment, the character will smoke three per day, increasing her happiness. .
Boris
He is equipped with the "Strong but slow" skill - he has 17 slots in the equipment, but his speed will be significantly reduced - and the "Smoker" ability, described by the previous character.
Bruno
Bruno's first skill is to be a good cook - the character will need less water and components to create both alcohol and medical items. The second is still the "smoker" skill.
Flowers
She is gifted with the "love children" skill - her happiness level will increase as she interacts with children.
Emilia
It is characterized by the ability "talented lawyer" - the character will lose less morale when faced with difficult situations.
Katia
She is characterized by two peculiar abilities - coffee drinker, able to increase her happiness as soon as she goes to drink coffee, and negotiation skills, which allow her to sell items at better prices than the competition.
Marin
He is endowed with the "Handyman" abilities - which allows him to need fewer buildings and weapons to create a weapon, as well as the "coffee drinker" characteristic, meaning that coffee will increase his happiness.
Marko
He is endowed with the skill "skilled digger" - meaning his equipment will include 15 slots.
Paul
It features the "fast runner" ability - it allows the character to run faster.
Roman
He has the "Combat Trained" abilities - which allows him to be better at fighting, and to fight even when / if he is depressed. Then the "Smoker" skill - if inserted into his equipment, the character will smoke one cigarette a day, increasing his happiness. Finally, "Rise of the Spirit", which allows the character to use the guitar to help other members of the group fight depression.
Equipment, Supplies, and Hideout
As you explore the area during the early stages, your characters will be faced with a large amount of drawers full of apparently useless items, but which could become crucial for survival during the war. After examining the furniture in detail, you will need to take a look at the bookmarks - one will indicate the items you currently own, the other will indicate the items you still have in reserve. The objects will be grouped into different categories, which indicate the primary objective.
During the game, you will often encounter some non-player characters. For your safety, we recommend killing them directly. Each object that you are going to recover will be placed in the common warehouse. In the case of food and care items, you can also view them using the fridge or medicine chest.
Both objects will be placed on the same level of the building (the ground floor). This way, injured characters will gain easy access to healing items. Keep in mind that not everyone likes to eat raw meat, so we strongly recommend that you cure the meat before starting to eat. You can do this using a simple stove, one of the equipment available in the hideout. To create a stove you will need to have the necessary materials available and begin construction near the special station.
Improve the hiding place
At this point in the game you should have accumulated a sufficient amount of resources, which will allow you to progressively improve your hiding place, creating some objects for the house. They can be divided into three categories: household items, warehouse items and consumer goods.
The "creation" area
The station is characterized by three levels: each improvement to the "next" level will allow you to gain access to additional items, which can increase your chances of survival.
First Level - Objects for the home
Bed: allows you to sleep better and decreases the time needed to return to good physical and mental condition. In general, members of your party can also sleep on the floor, but sleeping on the bed will make them more rested and happy. In general, it is advisable to invest in the construction of at least 3 beds. Even if / when you go to plan a great shift system, there may still be some unpredictable circumstances that will force you to put everyone in your party to sleep.
Chair: the chair will be particularly useful when all the beds have already been used. Used during the day, it will increase your happiness level and decrease your tiredness level. You will start the game with only one chair, which will be enough for the early stages. Rather than buying additional sets, we recommend eventually buying a second level "crafting" station, and then buying a sofa.
Heating: This is a great investment when / if you want to prevent your characters from getting sick from the flu. When the temperature indicated in the upper left corner of the screen drops too much, a heating system will protect you from any subsequent repercussions. The heating will only work if petrol is poured into it. In general, this type of heating won't be particularly useful until the temperature begins to drop.
Radio: radio increases the level of happiness through the use of music and news from the rest of the world. In some cases the group will also hear negative news, which will reduce the morale of the group - but this will rarely happen. We recommend building a radio almost immediately, as it will also allow you to get information on bandit assaults, as well as additional weather information.
Video - Launch Trailer
First Level - Objects for the laboratory
Oven: allows you to create more nutritious and healthier meals. To cook anything you will also need gasoline and water. By improving the oven level, you can create dishes more quickly. It is a crucial item for your survival, which must be created during the early stages of the game.
Moonshire still: this is the object that allows you to create alcohol starting from water and sugar. Alcohol can be used as a bargaining chip for trade, or simply to get drunk. In general, alcohol will be useful for trade, but you can also use other items for trade as well. It is not a necessary object to "break through" during the early stages of the game, but it can be useful later on.
Metal workshop: allows you to create useful items such as shovels, latches and knives. The knife will be used mainly for self-defense, while the rest of the objects will be used to remove obstacles in the field. After you've made a first upgrade, the Metal Workshop will allow you to repair guns, create new ones, and even build blades. In general, this is an investment that we recommend making during the very first phase of the game. In fact, it will provide you with access to crucial items for the continuation.
Rainwater collector: as the name suggests, it allows you to collect and filter rainwater, to be used later for cooking and / or creating alcohol. To then go on to perform the filtering, you will need an additional filter. We recommend making this item on the second day of the game, as water will always be needed eg. to create food.
First Level - Consumer Goods
Filter: a small object to be used in the tanks to purify the water. You will need to create it after you have built the water collector and / or have decided to create the alcohol.
Petrol: gasoline will be needed for cooking and for starting the fire. It can be created starting from books, wood and / or the appropriate components. We recommend that you periodically create "additional" gasoline, as it will be consumed very quickly. It will be created in a very large part to generate the heat necessary to cook the food. We recommend creating everything starting from wood, which can be recovered by destroying the wooden furniture.
Second Level - Objects for the home
Seat: the seat is a 2.0 version of the chair, and has very similar functions. This is a much more useful long-term item than a simple chair.
Wooden board: goes to protect your areas from the presence of bandits, who will often attack you during the night. It also increases the chances of a correct defense of the playing area and of being able to repel an attempted theft. When you decide to create a wooden barrier, your character will automatically select an area where it will be built. This item will help you greatly in case of an attack by bandits. We recommend that you quickly retrieve a large amount of components by performing a quick upgrade of the station.
Guitar: the guitar, similar to the radio, increases the happiness of the survivors. All characters can use a guitar, but some are better suited to its use. You will have to buy a guitar to avoid your characters' depression after they kill someone.
Second Level - Objects for the laboratory
Herb garden: during the early stages it will allow you to plant herbs, which can then be used to create medicines. Later, you can also plant vegetables yourself (you will need to use fertilizer).
Erbale laboratory: This is the area where you can create low quality medicines, bandages and fumes. During the next steps, it will allow you to create high quality cigarettes, as well as create some curing items. It is a rather useful object, although medicines can be exchanged, being able to produce them will always give you an edge.
Traps for small animals: combining them with food will allow you to obtain two additional pieces of meat. It can be one of the ways to get additional food when there is no more available.
Third Level - Objects for the house, laboratory, and consumer goods
Armored doors: Armored doors will be particularly useful against bandits who attempt to attack during the night. You can protect yourself more easily.
Distiller: this is a higher level version of the still you had previously. It allows you to gain the ability to craft higher level spirits and / or craft more potions
lamps: increase the growth rate of plants. The mixer will be used to create drugs or bullets.
Thermoregulator: makes thermo normals more efficient, and is necessary to create the still for alcohol.
How to get started?
During the first few days you will need to focus on getting food. It will be necessary for you to create an oven. After you have recovered a sufficient amount of materials, you will have to choose where to place the oven. It is preferable to make sure that all the tools are close to each other, and close to the crafting station. When you have completed the construction, you will see an action symbol just above the oven, which will allow you to use it immediately. You will then have to focus on creating an area to sleep in - make yourself a bed. We recommend using a large room so that three beds can be built in the future. If you still have time, we also recommend setting up a metal workshop where you can build some latches to open the doors.
The first expansion
After the first trip, all characters should have remained relatively "safe". You can then proceed further with the expansion of your hideout. You will almost certainly have the oven to create meals, the artisan workshop to create tools and a single bed for each of your characters. You will therefore have to start the second day by creating another bed and a rainwater collector. You will need to use a rainwater filter.
The next item you will need to buy will be the radio, which can help you in a variety of ways. First of all it will allow you to understand when / if the bandits have increased their level of activity. Secondly, it allows you to get accurate information about the weather changes - in case it is about to get cold, you will have to buy a stove.
Defense structures and advanced craftsmanship
At this point in the game it will be necessary to recover the furniture and objects of the second and third level. However, we recommend that you also complete the rest of the necessary items, and possibly also make upgrades. Also use the saw to unlock access to areas blocked by iron bars. Also try to add a third bed.
You will therefore have to focus on defense, trying to take advantage of a sufficiently rested army. By using the timber barriers you will also be able to maximize the protection capabilities against bandits. After you have repelled the bandits, you can start creating "new" upgrades, ie focus on the herb garden and herb warehouse. In general, the garden produces herbs, which you can then use in the special warehouse, combining them with other ingredients, to create medicines and perfumes. In addition, herbs allow you to create additional vegetables, which can further increase the amount of food you will be able to produce. To further increase the amount of food recovered, you can also place traps for small animals throughout the play area.
After you have upgraded to the third level of the crafting station, you will gain access to three items in the new "category". The heating lamps and the mixer will allow you to increase the "farming" capabilities, while the thermoregulator will be useful mainly to create the distillery.
The shift system
At the stroke of 8 pm the screen will disappear and the night will begin. The life forms you will encounter at night will be quite different from those encountered during the game. You will completely lose control of your hideout, and you will be able to examine the city map in detail, so as to plan the next moves. The supplies from the hideout won't be enough for you for long, and you won't be able to afford a moment of peace. You will have to prepare for a counterattack.
During the first night you can limit yourself to visiting some houses and some particular department stores and / or garages. Along the left area of the screen you will see your "favorites" representing the members of your group. You can therefore decide which character to use during the following hours of play. You will have to forcibly send one person to the city, while two others will be waiting for you near the hiding place. You will have to try to send someone with the highest level of capacity in terms of "backpack", healthy, well rested and not under the influence of particular stimulants.
Then click on the game area to get specific information about it (the objects that you can find in the area, the presence or absence of other survivors, the potential dangers). The rest of your party will need to be sent around to complete other objectives. There must always be some person present who will watch the playing area, to avoid anyone being attacked by bandits. We recommend sending both characters to the area. This way, during the next day, the other characters will be more rested and more effective.
You will also need to pay attention to illnesses and potential injuries, which prevent people from becoming night watchmen. A particularly weak guardian will no longer be useful for your purposes; moreover, in case of repeated attack, it will die more easily. We therefore recommend that you send a sufficiently rested character to the city with the maximum possible "load" capacity. Even when / if all members of your group are in perfect condition, one of them will still have to be sent to sleep so that he can work the next day while everyone else is asleep.
The selection of equipment
After completing all the decisions regarding the division of duties and selecting a specific area to explore, you will need to select your character's equipment. You will first need to accumulate some guns and some crowbars, as well as some latches. Unfortunately, during the early stages of the game, you won't have any available. We recommend recovering a certain amount of medicines and food, trying to exchange them with the other characters. After you have examined the play area in detail, we recommend that you begin examining the immediate area. If / when you don't have high HP characters in your party, we recommend staying inside your hideout.
Description of the playing areas
Abandoned Cottage: the abandoned cottage is a forgotten house that can be visited from the first day. You will be able to locate a large number of useful objects inside, without running the risk of being attacked. The "quiet house" will be available from day one; inside, there will be two elderly people. If you choose to steal their supplies, they will ask for your help and run to the upper floor. If you kill them, it will have a negative impact on the morale of your group.
Villa in ruins: The ruined mansion will be available from day one, allowing you to use a large amount of building materials, food and medicine. Inside, you can run into two possible scenarios - a married couple, or a group of aggressive soldiers.
Squatting area: The decrepit squatting area is a semi-destroyed area, where you will find almost exclusively building materials, sugar and some water. Here you will meet a homeless man who will ask you for something in exchange for food. If / when you help him, he will show you a warehouse where you can find jewelry and alcohol. If / when you don't help him, he will die after a few days.
Armored school: The armored school is a play area where you can meet a group of homeless people with whom you can exchange items, or a group of particularly aggressive soldiers. Several roads will be blocked by some bars.
Hospital: The hospital is a very quiet area, where you will find almost only injured characters who can be treated without having to pay money. Inside the hospital you will also find some lockers, as well as a doctor with whom you can exchange goods.
Flats: The small apartment will be occupied by a small group of armed soldiers, not particularly friendly. They will be equipped with various bulletproof robes, a helmet and a rifle.
Supermarket: The supermarket is a true paradise for anyone who needs additional items. Inside, two possible situations can occur - a soldier attacking a woman, or three armed soldiers. They will allow you to locate additional items, as long as you don't get in the way.
The intersection of snipers: as the name suggests, it is a very dangerous area. You will have to run from building to building to avoid sniper shots. You will also need to hide behind obstacles and quickly run forward to avoid blows. When you reach the bottom of the fountain you will meet a boy who will ask for help. You will then have to move towards the building from which the screams come, go down the sewers and unlock the passage so that the boy can reach his brother. He will give you items in exchange. There will also be a fair amount of food and medicines.
The Church of Santa Maria: this is a church where some survivors and a priest live. It will be possible for you to trade with the only pastor present, but all the other survivors will not be happy with his presence and will not allow you to reach the "deeper" area of the church. If / when you want to retrieve additional items, you will either have to kill everyone present or travel through the tunnel to the forgotten house, where you will meet a traveler. In both cases you will need to have some crowbars and some saws to reach the "locked" area. Some of the churches nearby will be controlled by bandits and it will not be possible for you to argue with them.
Garage: this is an area where father and son live. They will offer you items and weapons in exchange for some medicines. If / when you try to steal from them, a fight will start.
Hotel: this is an area where three different scenarios can occur: you can meet an armed man who will give you some useful items in exchange for alcohol; the same man but with an "aggressive" attitude, or an essentially neutral traveler, who won't give you any problems.
Cottage: it is a very safe area, where you can find a large amount of food, medicines and parts for weapons. To access it you will need a crowbar.
Military outpost: it is a base completely full of soldiers. They won't kill you until you try to get inside the play area. One of them will also want to trade with you. If you kill all the soldiers, you will gain access to some advanced weapons and various additional items.
Bordello: area where you will meet some neutral level bandits who will gladly want to trade with you. After you unlock the doors to the basement, you will find two prisoners in the area. Once this is done you will have to start killing the bandits - we recommend taking everything and recovering the objects scattered in the area.
Construction area: this is a particularly complicated area, the structure of which will change considerably when you visit it a second time. You will first notice two snipers who will try to shoot at one of the subjects - and you will find yourself on the "path" of the snipers. During the second phase, the play area will be abandoned and the basement completely submerged.
The Battles - First part
After you reach the selected area, you will take control of your character. This is a "foreign" territory for you and you will find yourself at night - only the immediate surroundings will be visible. You will therefore have to move with caution and avoid making noise, since you will not be able to clearly know who you will find on your path - absolutely avoid running.
Before entering the new play area, you will have to look through the lock to see if there is anyone on the opposite side of the door. The anti-noise system will be able to inform you through the appearance of some red pulsating circles - obviously, in addition to informing you, it will also inform your enemies, so the most effective strategy sees you avoiding any kind of noise.
The Battles - Second Part
If you find yourself involved in a fight, you will have to try to do everything possible to achieve victory, as your enemies will show no mercy. Starting to fight you will have to change game modes, to recover all the weapons available to quickly attack the enemy by clicking on the action button associated with it. Then, you can hit the enemy by quickly clicking on it. The fights will be different when you find yourself using guns - your character will in fact go and shoot exactly towards the area you click.
You can increase your chances of victory by hiding behind obstacles and shooting from there. We recommend hiding behind doors. After you have eliminated all the enemies, recover everything they have on them, especially weapons and ammunition. The time limit for examining the city is set at 5 in the morning. You will need to finish all your activities by 4:00 and then quickly return to your hideout. Otherwise, your character will be forced to walk around the city during the day, a potentially very dangerous activity.
Video - Gameplay Trailer
Take advantage of the Shadows
If you are certain that a given area you are in is on private property, you should avoid being located at all costs. Inside an abandoned house you might find a homeless person, in which case you can consider yourself "safe"; however, when / if you try to steal someone's items - an action that will be necessary if you want to be able to survive - you absolutely must avoid getting caught. The easiest way to stay undetected is to stay in the shadows - shadows that can be used for this purpose will be indicated by a special symbol placed directly above them.
Focus initially on your primary goal, which is to recover supplies. Examine both the drawers and the furniture. When / if you are seen by the owner looking in a drawer, the symbol of the action will change shape, informing you that you are about to be identified as "thieves". In such cases, a battle will almost certainly begin. First of all try to understand the weapon available to the opponent: if he is unarmed, it is better to try to run away. If the opponent is equipped with a machete or a pistol, it is necessary to give him battle.
The good and bad news
Back at your hiding place you will be able to examine a detailed report that will inform you about the events of last night. You will have access to both positive and negative news. We recommend that you always create a small supply of weapons, in order to react quickly to negative news. Another essential point, as we have indicated above, is to always return to the hiding place before 5 in the afternoon.
Mental and physical health
The events that happen during the day will have a direct impact on the health of the characters. If / when the character is tired or hungry, you can easily help him by using food or bed. The other states will present complications of a different kind. If / when the character gets the flu, you will need to give him medicine. If / when he is injured, your attention should be given maximum, as there is a possibility of his sudden death.
There will be different types of injuries - a small injury or a deep wound. Food chapter: if a character is hungry, he will need to be refreshed with a meal. If a character is very hungry, he will need to be refreshed with two meals.
Your patients will need to be treated well and then returned to the bed. If / when one of your characters kills someone, he could then suffer from states of depression and guilt, which will decrease the productivity and motivation of the character himself. To avoid these situations, you will first have to invest in a comfortable bed, a radio and a guitar, and therefore have group therapy activated. The members of the group will then be able to console each other by acting on the associated action key.
Providing help to passers-by?
In this section you will get information on the types of interaction with other survivors, which can be activated during your night travels and also during the day. Occasionally, some characters will head to your door and ask for help, or speak to you directly. Your neighbors may come to the area and ask you about incoming supplies, or ask for further help during difficult times. If you decide to help, the character who "answered" the request will leave the hiding place and return the next day. Clearly, his return is not assured, and no reward is assured either. We therefore advise against accepting these requests for help frequently.
The Commerce
One of the possible forms of interaction is the exchange of items with merchants and neighbors. You can either wait for them to knock on your door or go looking for them during the night.
To complete a transaction you will need to offer items of similar value to what you want to get. Medicines are the most valuable items, then food and weapons. In general, transactions are only accepted if they are offered of similar "types".
The moral choices
During the game you will have to make some "moral" decisions. Eg. during your explorations you will meet a man who will ask you for food, but without giving you anything in return. You will therefore have to decide for yourself whether to help him or not. It is important to remember that if / when you decide not to help him, you will not suffer any penalty!
Another time of potential "moral" difficulty will occur when you do not have sufficient food supplies. In this case, you will almost be forced to attack the church: by killing the priest and his followers you can take possession of their food supplies.
Video Solution - Playlist
Click here for the playlist!
Video Solution - Part One
Video Solution - Second part
 This War of Mine pc
- pc
- iphone
- ipad
- android
Exit date: November 21, 2014


