UPDATE = Wii Software Modification Guide All Versions 3.0 to 4.2
We are finally here, thanks to the efforts of the homebrew developer community, it is now possible to boot backup copies su Nintendo Wii even without modifying the console with a modchip. If you follow this guide you won't even have to open your console and starting your DVDs will be very simple and free of charge :D
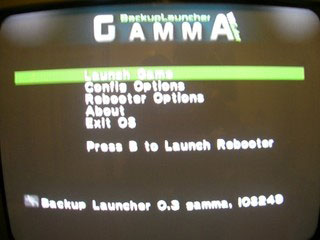
The guide is about Backup launcher 0.3 gamma by WiiGator.
Attention!!! Don't make any updates to your console! Future updates hacer The system described here is unusable and may inevitably compromise the operation of your console. If you have version 3.3E with the update after October 23 (3.3E v2), you can still follow the guide until point 5 and then follow this post to fix all the problems. If you have version 3.4E you should in any case follow this post and download the sd_{brand_origin}-3.4E.rar version
If you have version 4.0 you must use another method called BannerBomb and described in this post -> Modify Wii Firmware 4.0
The NEW COMPLETE GUIDE with images and videos to Modify ALL versions of Wii -> Guide Modify Wii Software from 3.0 to 4.2
{brand_origin}, the staff and the author of the article, do not assume any responsibility, follow the instructions at your own risk. On this blog we are against piracy. Only use backup copies of games you regularly purchase and own.
For the most frequently asked questions, I have grouped everything together with the relevant answers in this article. FREQUENTLY ASKED QUESTIONS .
Latest guide updates:
[04/11/2009] New complete guide added! Link available above!
[10/12/2008] Added note for new firmware 4.0
[10/12/2008] Homebrew Channel version updated to 1.0.1
[05/12/2008] Some information about error 324 was changed.
[24/11/2008] File added for modification in Nintendo Wii firmware version 3.4E
[23/11/2008] Error 324 when loading backup; Added possible fixes to this bug.
[16/11/2008] Added Backup Launcher version 0.3 range and new cIOS IOS249 v7. Information was added and removed.
[11/11/2008] Added notes for Wii firmware version 3.3E with update after October 23.
[08/11/2008] Added information about the format.
1. Download sd_{original_brand}.rar
Simply download this sd_{origin_brand}.rar file (or the sd_{origin_brand}-3.4.rar version if you have the firmware 3.4E) with everything ready to start your backups. Inside the file you will find: Zelda Twilight Princess save cheat, HomeBrew channel, backup launcher and cIOS installer. You don't need to download anything else.
Download por firmware <= 3.3E : sd_{source_brand}.rar (Mirror: sd_{source_brand}.rar)
Descarga por firmware == 3.4E : sd_{origin_brand}-3.4E.rar (Mirror: sd_{origin_brand}-3.4E.rar)
The file contains this: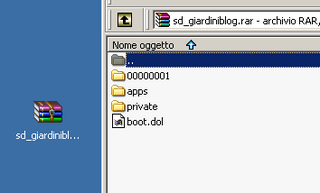
2. What you need to get started
Get the following things:
- A console Nintendo Wii
- An sd memory card (high capacity SDHCs do not work) maximum 2 GB
- Un way of writing/reading en SD card from the PC (a card reader, a camera, something where you can insert the SD)
- An original copy of The Legend of Zelda: Twilight Princess
3. Copy the Zelda Twilight Princess save file from the Wii to the SD memory card.
If you do not want to keep your progress in Zelda Twilight Princess, skip this point and go directly to 4.
Make a copy of your original Zelda save file because we will then replace it with the modified one. To make the copy, go to the Wii menu -> wii options -> Data management -> Saved data -> Wii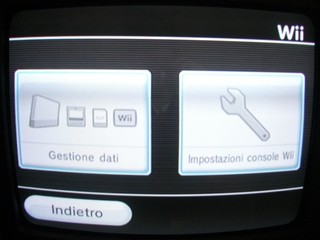
With the SD card inserted, copy the Zelda save from the console to the newly inserted memory card by clicking save and choosing Copy of menu Wii console.
After copying the saved file, insert the SD card into a card reader to read it on the PC (a camera that reads SD cards is also fine) and grab the file. data.bin from the directory /private/wii/title/ by copying it somewhere so you can use it again later without losing your game progress.
4. Copy the entire contents of the sd{brand_origin}.rar file to the SD memory card
Extract the files from the archive we provide and copy them all content from PC to SD card overwrite the files if necessary (you can extract the file directly to the card). At this point the SD memory card must have at least these files in the root:
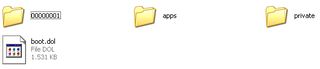
- / 00000001/
- /private/
- /Applications/
- boot.dol
/private/ is the directory containing the modified save, the file boot.dol are theCanal HomeBrew which will allow you to load all the programs specially created by the developers. File /Applications/ contains the programs you need to read your recorded backups. The other directory / 00000001 / It will be used to install the cIOS (required).
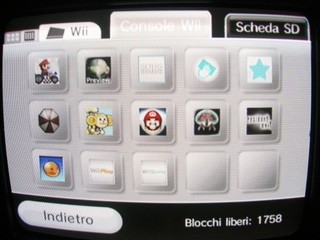
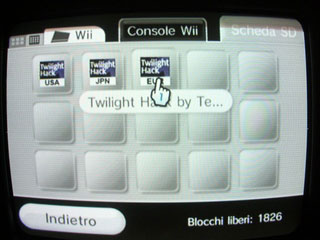
At this point, we need to copy the modified save contained on the card to the Wii. To do this, access the Wii menu -> Wii Options -> Data Management -> Saved Data -> Wii and choose the menu above SD card, select save as Twilight EUR Hack (as shown in the figure) and choose Copy.
5. Install the HomeBrew channel with Zelda Twilight Princess
Insert the SD card into the Wii and run Zelda Twilight Princess original loading the first (and only) save. Walk with the character and talk to the person in front of you; confirm and the installation will begin immediately on your console.
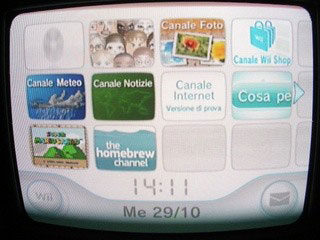
If everything has gone well, you should find a new channel in the main menu, theCanal HomeBrew.
6. Start your backups :-)
At this point we are almost done. Start the HomeBrew Channel from the main menu with the SD card still inserted and you will find a series of programs, that is, those contained in the directory. /Applications/ from the SD card.
First select from the list cIOS Installer and start the installation by pressing A. The installation of cIOS should only be done the first time and without having the gamecube joypad or memory card inserted.
If at this point you have problems and you have the firmware 3.3E or 3.4E Follow this other blog post to solve them and continue. Otherwise, read on.
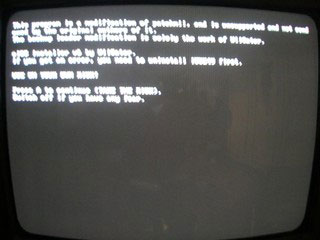
Congratulations! Now you can safely start the Backup launcher, insert your burned DVD and choose Open game. With the gamma version it is also possible to start the game from the console channel by pressing the B button (the WiiMote trigger). This last feature only works with 1:1 copies of the games (that is, ISOs in which the content has not changed from the original).
Almost all games work perfectly, but for the full list of tested titles see this site -> compatibility list
7. Resolve error 324 when trying to upload a backup with Backup Launcher
If you have this error, continue reading, otherwise skip directly to the notes (point 8).
There can be two causes for this error: the media that does not read correctly or a problem with the cIOS Installer.
Download the cIOS Uninstaller from here copy it to the folder /Applications/ and run it to remove cIOS. At this point try using again cIOS Installer and upload your backups with Backup Launcher. If this doesn't work either, delete the folder. / 00000001 / from the SD card and with the console connected to the internet, repeat the reinstallation of the cIOS installer (this way the files are loaded from the internet and No. from SD card).
If you have followed the procedure and the error always appears 324 then you have to change the media and/or brand and/or recording speed by doing several tests to find the one that works with your Wii player. Use preferably DVD-R o DVD+R change the DVD book type to DVD-ROM (see the manual for your burning program). HE DVD-RW They don't work as well as Gamecube backups.
8. Note
After installing theCanal HomeBrew and verified that your backups are starting, you can delete the directory /private/ the directory / 00000001 / the directory /applications/cIOS_Installer/ and the file boot.dol from the SD memory card. Now you will only have the Backup launcher done
If you want to use other programs, simply copy the program you want to run to the folder /Applications/ from your SD; ICanal HomeBrew It will always show you the contents of that directory with the programs to start.
You can also play en línea with your backups.
To use Backup Launcher you must always keep the SD memory card inserted.
Do you still have doubts? Read the FAQ about software editing on Wii.
9. Return to the original situation.
For any problem, it is obviously possible to go back to the original situation and remove theCanal HomeBrew. To do it, No. It is enough to delete the channel (there are remains) but you must format your console, deleting all the content (Wii Menu -> Wii System Format). Even if you have formatted, you can easily redownload the titles and programs you previously purchased for free. Wii Store (only linked to your Wii ID). Remember to copy the saved games to the SD card to restore them later after formatting.
If you liked the article, buy me a coffee by clicking on the cup :)How To – How to start backups with software modification on Wii (without modchip)